Still using the classic admin? Click here to learn where you can find the registration field settings.
Custom registration fields are what you use to build out the registration profile for all of your users. These fields are either filled out by your registrants using the registration form, inserted via integrations importing or UTM codes, or calculated and provided through their activity on BigMarker. Those fields can then be used in a number of different ways:
-
Export to your CRM of choice using our ready-to-use integrations
-
Register users for other content on your channel
- Organize users into Segments for persoalized messaging and content
And much, much more.
Some features may not be available in your channel if you are not an enterprise or event customer. Contact your BigMarker point of contact if you have any questions
Creating custom registration fields
To create custom registration fields, first visit the session admin and then go to Basic Setup > Registration Fields
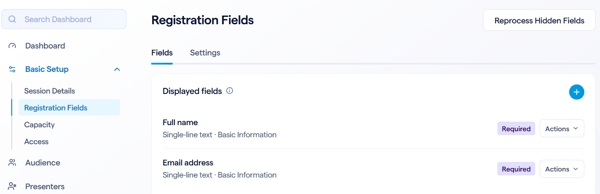
You'll see fields broken up into three categories:
- Displayed fields - These fields will display on the registration form
- Consent fields - This is where you can configure your GDPR fields
- Hidden fields - These are fields that are not displayed on the registration form
Click the plus button within the field category that you want to create to get started.
Registration field types
After giving your field a title, the most important setting is the field type. This determines how your users will provide a response, and can also determine how other registration field settings are configured.
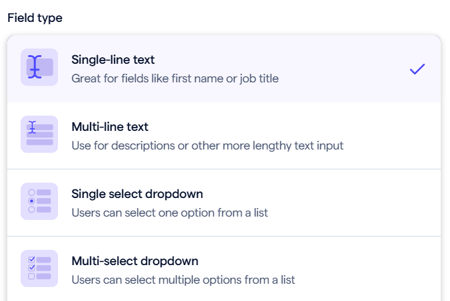
Single Line & Multi Line Text - These field types will have your registrants type freely for their responses.
Single-select dropdown - A multiple-choice field where you provide a custom list of response options
Multi-select dropdown - Same as the other dropdown type, only that registrants can choose more than one response option
Location dropdown - A multiple-choice field that is pre-populated with a list of countries
Checkbox - Reponses from registrants will just be a single checkbox, This field is great for agreements and yes/no questions.
Label - This will just be text shown in the form, no response can be given to these fields
Date Selector - Users will choose a date on the calendar for a response
Anti-spam field - A very unique type of field. It does not display for any regular user, but bots and other malicious actors may inadvertently fill out this field. With this, you know that any registrant that has this field filled out is most likely not legitimate.
When you set a field to be an anti-spam field, most additional settings for this field will be unavailable.
Webinar Selector - This is functionally similar to the list field type, except for this field each response can be associated with another webinar or series on your channel. If users choose that option, they are automatically registered for the associated session.
If you are considering letting users choose their own schedule in a series, consider using an itinerary series
Calculated Field - The calculated field is not responded to by the registrant, but instead is calculated dynamically based on the registrant's activity and information.
Under the type setting, you'll have another for Default Value, the value that will be added to this field for all registrants if they do not submit an answer to this field. Finally, you'll set whether the field is required or not.
Registration Field Settings
Once you have the basics covered, you are ready to move on to the registration field settings. There are many settings available to customize the registration field to your exact needs. We'll cover some of the more commonly used ones below.
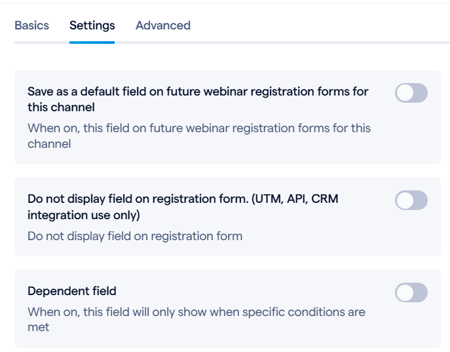
- Dependent Field: Dependent Fields will only appear based on the response to a different field.
- Do not display field on registration form: This setting determines if the field is shown on the form. It also gets set depending on what category of field you started to create, but you can change this at any time
- Apply Response Mapping: Response mapping ensures that you have consistent answers between your analytics reports and your downstream integrations
- Merge field: Combine and transform multiple registration fields into one with the merge field
Advanced settings for registration fields
Along with the basic settings, you'll have some additional advanced settings available. These settings will be broken up into a few different categories:
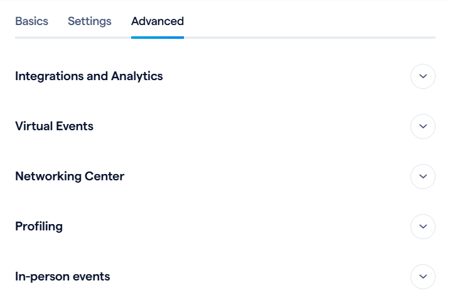
- Integrations and Analytics - Here you'll find settings that interact to progressive profiling, Stripe metadata, and more.
- Virtual Events - Settings specific to the registration and check-in flows for your virtual event
- Networking Center - These settings will determine how the field is shown and used in the various networking center pages of your event
- Profiling - These settings are mainly for use in the companion app but also for your SMS Notifications
- In-person events - These settings interact with the on-site scanner app and badge printing
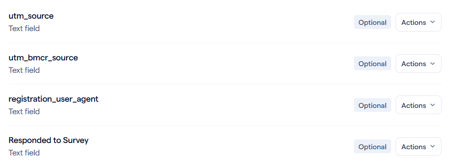
BigMarker-Created Fields
For all webinars and series on BigMarker, there are some automatically generated hidden fields available. These are either industry-standard fields like the generic UTM codes shown in the screenshot, or they are fields that interact with other BigMarker features.
BigMarker will automatically update the following fields:
- Responded to survey - Will have either "Yes" or "No" depending on if the registrant submitted the survey
- Ticket Pass Name - When a registrant selects a ticket as part of an event, this will have a response matching the name of the ticket that they chose.
- On-site check in status - Wil either have "Yes" or "No" depending on if the registrant checked in to the event.
For the best compatibility across BigMarker, you should not rename, delete, or edit these fields. Contact support or your point of contact for more information.
Registration fields in the classic admin
To find your registration fields in the classic admin, visit the Manage Dashboard and look for Custom Registration Fields. Here you will see the list of registration fields and the ability to add or edit them.
