It’s crucial to create a clear, cohesive, and concise check-in process for your event. Learn how to set up the check-in process for your event below.
Table of Contents
1. What does check-in look like?
2. Creating your Virtual Event Check-In
4. How Can I Adjust Settings for Check In?
What does Check-In Look Like?
Check- in is after registration, where your attendees will get a first glimpse of your event and enter in their personal preferences. View check-in from an attendee’s perspective in the video below:
Creating your Virtual Event Check-In
First, create your virtual event on BigMarker. After creating your virtual event, you’ll proceed to the Event Basics Setup page. To edit your check-in, select either option:
1. In the Events Module section, click on the Check In Module
2. In the Check-In sub-section under Event Basics
Note: You will need to toggle ON the Check-In module in the Event Modules section.

The Check-In page (shown below) lists every element of your check-in process, including the attendee badge creator, preferences setting, matchmaking configuration, etc. Toggle each one ON to enable it for your check-in process — or switch it off if you don’t want to include it in your check-in process.
You can customize each module and turn on a “test environment” for that specific module to test it before your event goes live.
Finally, you can switch to the Settings tab of this page to set permission levels, require SSO and/or email verification and more, as needed. 
Modules for Check In
The modules detailed below all have different customizable options.
The first module, and an important introduction to your event, is the Welcome module. When attendees log into your event, they’ll be greeted by a welcome page. You can customize this with your branding, logo, and colors, as well as a welcome video.
Below are the customization options:
- The Left Menu Text - The title of the Welcome page in the navigational side bar
- The Welcome Page Title - The opening message to welcome your attendees
- Main Media for the Welcome Page - i.e., the video or image on the center of the page
- Welcome Video Type - type of video in iFrame, On-Demand, or .mp4 upload
- Welcome Video Description - A description of your video
- Next Button Text - What the button is titled to move to the next step in the check-in process

Guests can also create their own badges upon checking into the event. This includes their name, job title, photo and other information if desired.
In the Your Event Badge module, you can customize the page where attendees set up their badges. Options include:
- The Left Menu Text- The title of the Event Badge page in the navigational side bar
- Check In Main Title - The title of the Event Badge page (example is Create your Event Badge in the photo below).
- Check In Sub title - The sub-title below your main title
- Change Photo Text - The call-to-action text notifying attendees to change/upload a photo of themselves.
- Check-in Badge Background Image - This is the banner that appears along the top of each badge.
- Bottom Title - The title that displays the end of Event Badge creator(we recommend using this as a footer).
- Bottom Description - The description that goes below the bottom title
You can also give attendees the option to upload their own profile photos by enabling on Allow registrants to upload their own profile image.
In the About You Module, guests can answer more questions about their job function, interests and preferences during check-in. (To add questions to this page, add custom registration fields to your registration form.) This information can be used for marketing purposes — or it can be used to match attendees during speed networking and AI-powered matchmaking.
You can customize the page in which attendees answer these questions. Here, you can customize the Left Menu Text if desired.

During check-in, attendees can also set their preferences for networking at your event. This will be the basis of other attendees viewing their profile, social media accounts, and how they can interact with each other.
In the Preferences module, customizable options include:
- Left Menu Text - The title of the Preferences page in the navigational side bar
- Preferences Title - This is the title of the page.
- Connect with others Title - This is the subtitle of the page.
- The following for each social media platform (LinkedIn, Twitter, Calendly, Instagram, Tik Tok, Facebook):
- Ask for Social Media Platform - Will you ask attendees to provide links to that account?
- Social Media Platform Title - This is the text that appears next to the checkbox for each social media platform.
- Social Media Platform Purpose -This is the text that appears below the checkbox for each social media platform.
- Ask for Social Media Platform during Registration
- Social Media Badge Image - the icon that will display of the social media platform on the Networking Center

Staying in this module, you can customize the registrant's email preferences. These allows attendees to access and reach out to one another via email — and show if they are available or unavailable in the Networking Center.
Customizable options include:
- Enabling on/off Ask to share email with participants: Ask attendees whether or not they want to provide their email address (If this is disabled, attendees cannot share their email address with others at your event.)
- Share Email Address with Others Text
- Enabling on/off Share my email with other participants
- Share Email with Other Help Text
- Enable on/off Set Networking Status: Allow attendees to set their availability status in the Networking Center.
- Set Networking Preferences Status Text
- Available Text - The availability status title for attendees
- Available Description Text - description of availability status
- Not Available Text - The un-available status title for attendees
- Not Available Description Text - description of un-available status

On the Matchmaking page, attendees can also share their interests and other information, which will be used to match them with like-minded attendees in the Networking Center. In the Matchmaking module, you can customize the matchmaking text, title text, sub title text and footer text of this page.
To set up the Matchmaking categories, you will need to go back to the event’s dashboard and click Matchmaking in the left hand side. From there, click Create Category.
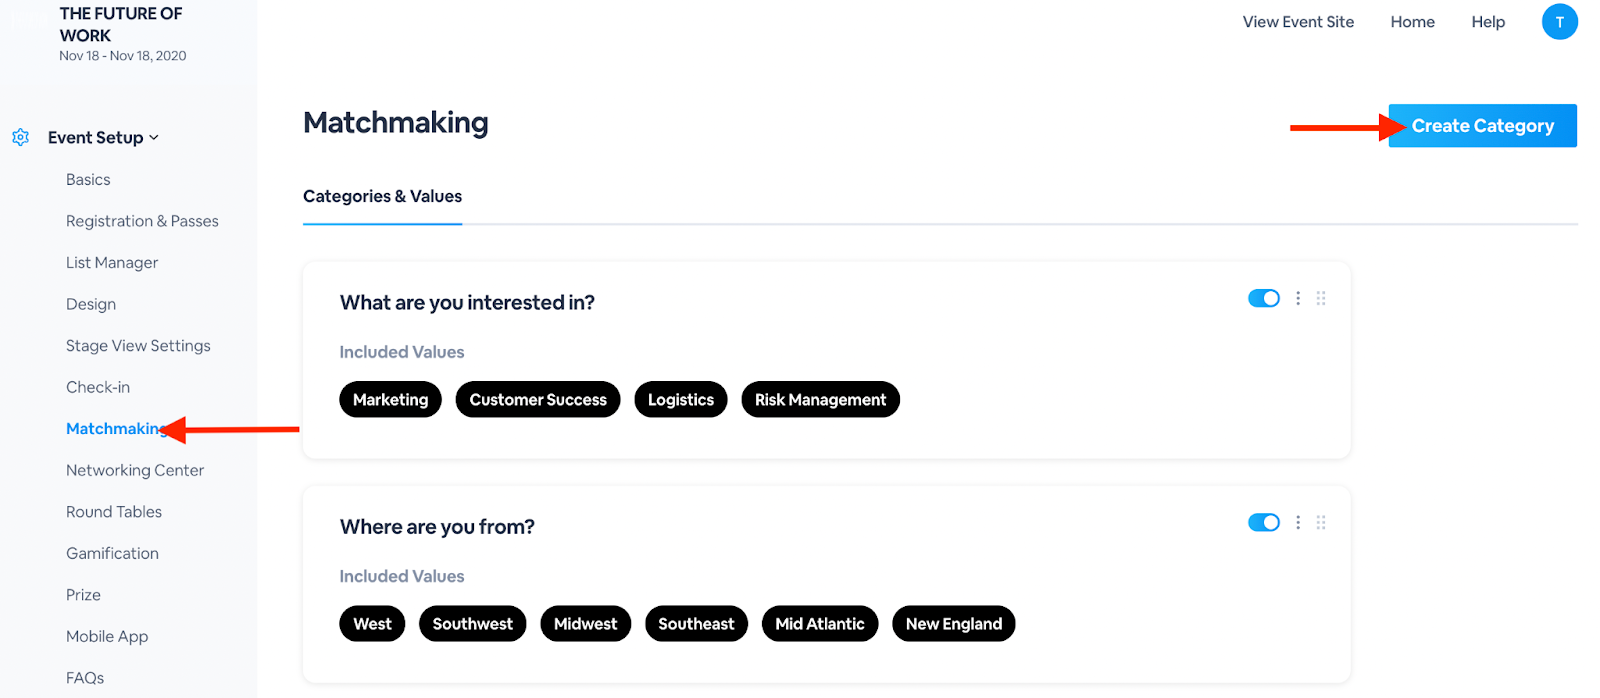
From there, give the category a title (format as a question, general topic, etc.) and enter the different values in the text field below. For example, the category is Interests and attendees can choose from entrepreneurship, marketing, operations, strategy, business and sales.
You can opt to have these matchmaking categories and values as filters in the Networking Center, display on the attendee’s business card and select if the category can have multiple values selected or only allow for a single selection.


Finally, attendees can register for sessions and them to their personalized agenda. This page can be populated with every session in your virtual event – or if you’re using custom registration fields, this list will populate with sessions related to the interests that attendee submitted via those custom registration fields (learn more here).
In the Choose Schedule Module. you can customize:
- Do not allow attendees to register multiple sessions with the same start time: Toggle this OFF if you do not want attendees to register for multiple sessions that start at the same time.
- Show add to calendar: When active, attendees can add the session to the calendar by clicking a button.
- Show how many spots remaining (if there is a capacity limit): When this is active, attendees can see how many seats are remaining in sessions with a capacity limit.
- The maximum number of sessions registrants can register to: Set a maximum number of sessions that attendees can register for during check-in.
- Which Main Series the sessions are under: In this field, select the Main Series’s sessions you would like to have attendees choose their schedule from.
Additionally, you can customize the Left Menu Text, Choose Schedule Description, and Bottom Text of this page.

In the Check-In Settings module, you can change the design settings of the overall check-in process. Here, you can customize the Check-In Header Logo, Check-In Header Logo Link, Text Color and Save and continue button text.
If you want to use the default background color and design settings, leave Use Event Design toggled ON. If you’d like to add your own background color or image, etc., toggle Use Event Design off, then use the subsequent prompts to add your own color, logo, etc.
Finally, toggle Show Registration Connect Profile ON to display Check-In on the top of your event microsite.

How Can I Adjust Settings for Check In?
Return to the Check-In page, then select the Settings tab.

You have a few options to select from in this section:
- Virtual Check-In Version: Select version 2 for the most optimized Checkin experience.
- On-Demand Check: In order to view your on-demand recordings, attendees will need to be registered for the webinar associated with your on-demand webinar. Select that webinar in the provided dropdown menu.
- Check In Flow: Would you like registrants to go through the check-in process every time they log into your event? If so, select Always redirect to check in. If you’d like them to go through the check-in process only once, select Only go to check in the first time.
- Redirect Location After Completing Check In: Where would you like to redirect your registrants to after they check in? Choose between the landing page, confirmation page or a custom URL.
- SSO Login required to view landing page: If enabled, registrants will log in via SSO before viewing the landing page.
- Require attendee login with password: If enabled, attendees will be required to enter a password before logging in.
- Require email verification during log in: If enabled, attendees will receive an email verification/login link to their email address before entering your event.
- Show Registration Profile (for header navigation): Enable on or off the attendee’s registration profile in the top navigation bar.
- Send Registration Confirmation emails from every session: Enable on or off sending a confirmation email from every single session in the series when a user registers.
- Enable Google Translate on landing page: Enable on or off Google Translate on the landing page
- Show header navigation during check-in: If on or off the top bar navigation during check-in.