Using the classic admin? Click here to learn where you can find the survey settings
Adding a post-event or post-webinar survey allows hosts to capture audience sentiment via 5-star and 1-10 scale ratings, multiple choice questions, long and short-form answer responses and more — and then use that information to create more relevant content.
- Adding questions to your survey
- Designing your survey
- Sending your audience to the survey
- Survey settings
- FAQ
How to enable webinar surveys
In the Session Admin, you can find all of the settings for the survey in Engagement > Survey. Some settings will be available on this page, but to fully customize the survey click on Open Builder.

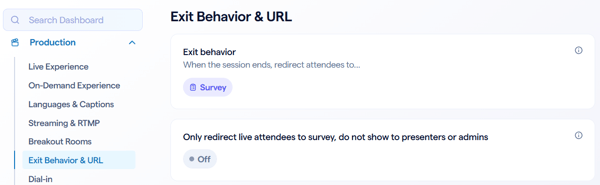
The survey for any session or series is always there. You don't turn it on or off, but instead you decide if and when your audience will be directed to it. You'll configure this either inside of the survey builder or in the session admin in Production > Exit Behavior & URL.
You can also enable the survey to appear in your on demand player. Look for the setting Show webinar survey in video player at end of the video in the recording payer settings.
Adding questions to your survey
Once you open up the survey editor, you'll first see the settings for Questions. Here you will enter in all of the questions you want to ask in the survey. Click Add questions to get started.

You have a number of different types to select from: NPS score, 1-5 star rating, short answer, long answer, multiple choice and grid/Likert. Depending on the type, you may see additional settings to add response options or other settings.
To show one question text to your audience and display a different text in your reporting, select Show a different question (Use original question above for reporting and CRM integration), and the question entered in the top box will show in reports/integrations while the bottom question will display for attendees to answer.

You can also have any survey question be dependent on a previous questions answer. This works the same as our dependent fields within custom registrations. Click Show this question based on answer from another question to have a dependent question in your webinar survey. For example, if you would like specific feedback on attendees who rated your event 5 stars, you can provide a follow-up question for them to answer.

When adding a dependent question, you also have the other option to hide this question if a previous one has been answered. This is useful for when you have lead generation questions such as asking for a phone number or other contact details that you may ask in multiple different dependent survey questions, but you don't want your users to have to answer it multiple times.

Using Data Mapping
Additionally, for any question you can add data mapping to your survey questions. Click Apply data mapping, then use the dropdown to select the data mapping you’d wish to apply to the survey question. Click Edit or create new data mapping to redirect to your channel’s settings where you can add new data mapping or edit existing.

Designing your survey
In the design tab, you can edit the title & description, confirmation message, choose a theme color and add an image for the survey logo.

Sending your audience to the survey
Once you have configured your survey to your liking, you'll want to decide how your registrants will find it.
Redirecting after the live session ends
The first and most common option is to direct attendees to the survey after the session ends. Look for the setting Show the survey immediately after the webinar ends and enable that to send users to the survey when you end the webinar.

Sharing a direct link
At the bottom of the Settings tab you'll find some options to getting a direct link to the survey. You can manually copy the displayed link or click Copy Survey URL. There is also an option to download a QR code for the survey to display for attendees to scan.

If you are using a recurring webinar, you also have the ability to copy a link to a specific session's survey. Survey results will be unique to each individual session of the recurring webinar, allowing one registrant to provide multiple answers for the survey. You can also now access the individual links for each of those session’s surveys.

Note: When using the Survey URL outside of the webinar event, where an attendee would not be logged in or associated with their BigMarker ID, they will be required to enter in their first name, last name and email address to gather analytics.

Emails & offers
Inside of the live session, you can use the pop-up offer to send users to the survey. Look for the Button Link settings and choose Post Webinar Survey

For any email you want to send to your registrants, you have the option of including the token for the webinar survey. This token is a variable that will personalize the survey link for each registrant, logging them in and tracking their responses.

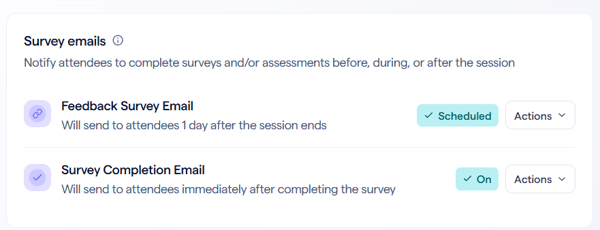
Additionally, there is an email dedicated to just sending the survey as well as one that you can send once a user completes the survey. In the emails section, look for the Feedback Survey and Survey Completion email types in the Post Session email category.
Additional Survey Settings
In the Settings tab you'll find a number of different settings that change the behavior of the survey.
With these settings you can allow attendees to fill out your webinar survey anonymously, allow users to skip the survey via a button at the top of the survey, and also choose if your survey exit URL is different from your webinar exit URL.
One setting that is important is the Submission Method. By default, surveys are submitted when users click Submit at the bottom of it. However, you can switch to Submit Partial Response so that answers are recorded when users input them. Record answers from partially submitted surveys. With this on, responses are saved even if users leave the page before submitting.
Note: With this setting on, no question is technically “required” as responses are added solely based on what attendees choose to respond to.

FAQ
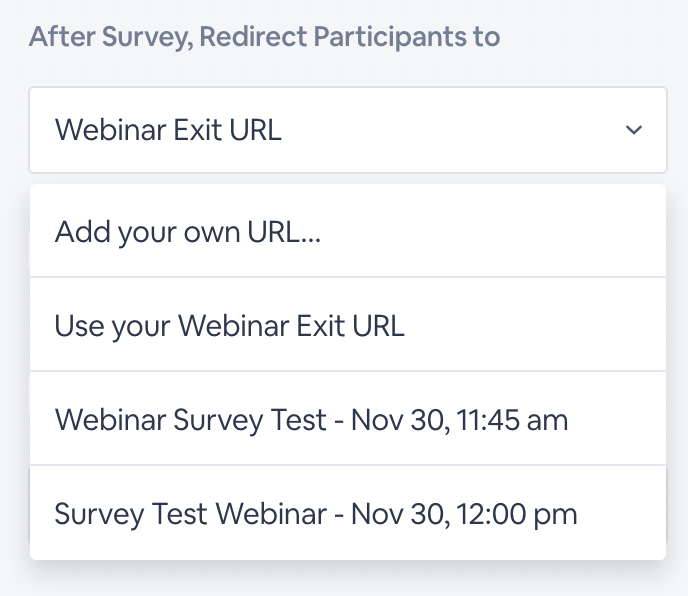
Where can I redirect participants after completing a survey?
Click the After Survey, Redirect Participants to dropdown menu. Using the provided options, choose where to redirect participants — the current webinar survey, an external URL or a different webinar.
You can manually copy the displayed link or click Copy Survey URL. There is also an option to download a QR code for the survey to share with attendees.
How can I view the analytics for my survey?
You'll be able to see a full breakdown of survey responses in the session admin in the Analytics>Survey. Click into any one of the questions to see a detailed list of how each person responded. 
Surveys in the classic admin
Visit the webinar dashboard of the session or series you are updating and go to the Surveys and Assessments page.
