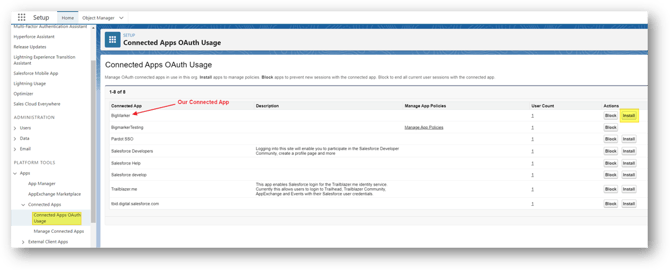
Important: Upon authenticating your Salesforce integration for the first time, a "Connected App" will be created in your Salesforce environment:
BigMarker will be listed under Connected Apps → Connected Apps OAuth Usage
After selecting Install, you will be able to adjust its authorization settings, updating or extending the refresh token expiration. Please see this article for more details.
When you connect BigMarker with Salesforce, your BigMarker webinar registrations and data are sent directly to your active Salesforce campaigns. And it’s a two-way street: you can also add your Salesforce campaign members as invitees and registrants to your BigMarker webinar.
Table of Contents
- Connecting Salesforce to BigMarker
- API Limitations
- Import Invitations Settings
- Import Registrants Settings
- Data Enrichment
- Create a Salesforce Campaign
- Export Lead Settings
- Export Contact Settings
- Campaign Member Settings
- Export Attendee Data Stream
- Progressive Profiling Settings
Connecting Salesforce to BigMarker
Before we begin connecting Salesforce to a specific session or event, you have the option to connect Salesforce to your whole channel. Go into your channel settings and navigate to the Salesforce Settings tab.
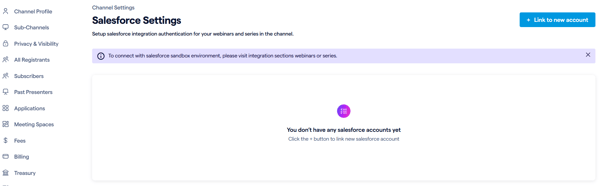
Here you can connect multiple Salesforce accounts to your channel by clicking the Link to new account button in the top right corner of the page. Configuration on the channel level will eliminate the need to input your Salesforce credentials for every session.
To connect a webinar or series, navigate to your session admin or classic dashboard and select the Integrations page. Find the Salesforce integration.
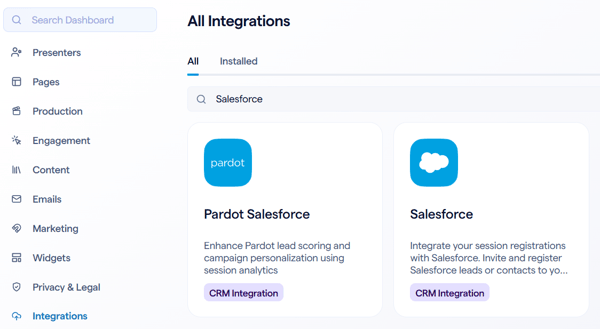
If you have Salesforce integrated with your channel, click Connect to Salesforce Production Environment Using Channel Settings and select your Salesforce account. Otherwise, to connect your account on the webinar level, click Connect to Salesforce Production Environment.

If you'd like test your Salesforce integration without harming the official data in your Salesforce account, select Connect to Salesforce Sandbox Environment. This allows you to set up your integration, practice mapping data, etc. with no impact on your existing Salesforce records.
API Limitations
When you first open the settings to configure the Salesforce integration in your webinar, series or event, at the top you will see a setting to limit the amount of daily API calls. You'll also get a quick glance or your total and remaining numbers of daily API calls to Salesforce.
By default, there will be no custom limit imposed, only what your daily limit allows on Salesforce. Turn on the setting for Pause Salesforce sync to set a custom limit of API calls per day to free up space for other services.

Import Invitations Settings
In the first settings you'll be able to import a list of users to invite to your webinar or series. Once your Salesforce account is synced with BigMarker, your active Salesforce campaigns will automatically populate into the dropdown menu below “Salesforce Campaigns for Invitations.” Select the list you would like to upload to BigMarker. Under Contact List Name for Import, give this contact list a name to be stored on BigMarker (e.g., “Salesforce Contacts”).

This list will then be available for you to send an invitation email to.
Import Registrants Settings
Next, you can import contacts from active Salesforce campaigns to your webinar’s registrant list. This automatically registers all of the contacts on that list for your webinar.
In the dropdown below, select your desired campaign. From this campaign you also have options to Import new leads, import new contacts, and decide if you want to continue to import new registrants after the webinar has ended and become an on-demand session.

Data Enrichment
If a registrant has an email address that matches a record in your Salesforce account then you can use Salesforce Data Enrichment to import or update registration fields on BigMarker with that data.
This means that you can have a basic registration form that asks for just a few fields, then import the rest of your fields from Salesforce to those existing users. Once you enable data enrichment, you will configure which BigMarker registration fields corresponds to which fields from Salesforce.

After registration is complete, the values for each of the fields will be implemented from Salesforce.
Create a Salesforce Campaign
Create a campaign of your Salesforce Events, either for your exported contacts or leads. This automatically creates your campaigns for you after setting up, reducing the time needed to manually create them. To do this, you will need to have webinar tags created and associated with the webinar.
Check off Create Salesforce campaign for this event to turn this setting on. From there, select to create a campaign for exporting leads, exporting contacts or both. Then, use the dropdown menu to associate the webinar’s webinar tag from the Salesforce Campaign Name dropdown menu, and map your Salesforce Campaign Fields to the equivalent BigMarker field. Once finished, click Save AutoCreate Settings to save the mapped fields, and Sync Salesforce Campaign to create your campaign in Salesforce.

Export Lead Settings
Under Export Lead Settings, choose the Salesforce campaign that will receive attendee and registrant data from BigMarker (i.e., “Event Contacts and Attendees.).
Under Map Data Fields, you’ll choose which BigMarker fields correspond to what Salesforce Lead Fields. After selecting which Salesforce campaign you will be exporting to, you can use the dropdown in each row to select the right lead field.

Right above the map fields section, you have a settings that control the following:
- What should happen if a lead already exists in Salesforce
- What and how existing leads should be updated
- Criteria for exporting based on attendance and/or watch time
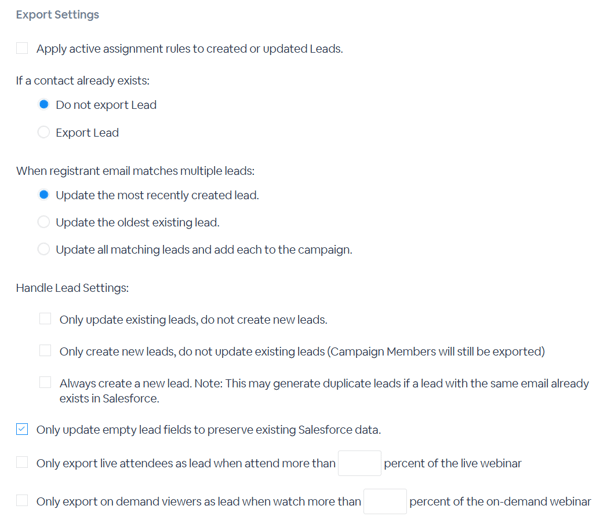
If you only want to export some of your registrants to Salesforce, look for the Export Conditions setting right under the field mapping. Configure this to only export a registrant if they have a specific value in one of their registration fields. This setting is available for both contacts an leads.

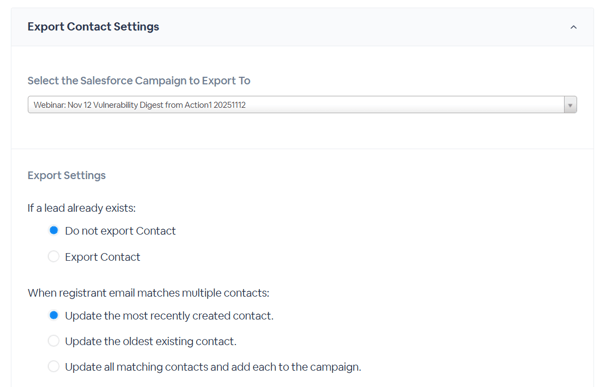
Export Contact Settings
Next, you can map data fields in BigMarker to their respective contact fields in Salesforce. These setting are identical to the export lead settings. Choose the campaign and map the fields to export to your contacts.
Campaign Member Settings
In this section you can apply different member statuses to your campaign members, as well as map fields and activities to those in Salesforce.
The different member statuses different statuses are based on certain types of users:
- Registrants
- Attendees
- On-demand viewers
- (In-person events only) Checked-in on site
When configuring member statuses in a series, the statuses for Attendees and On-demand viewers will be triggered when that registrant does so in any webinar or video attached to the series
It is important to note that before mapping data fields from BigMarker to their campaign member fields, they MUST be mapped to either a contact or lead within BigMarker first.

Export Attendee Data Stream via Salesforce Custom Object Setting
Keep track of your attendance within live events through exporting live attendee data to Salesforce in 5 minute intervals. After your event starts, utilizing the API name entered below, a record of every attendee within the webinar room will be created. With the consistent export of data, tracking attendance in your events is easier than ever before.
Click Enable Attendee Data Stream Export and enter in the API name of the Salesforce Custom Object you would like to use for this export. Below, you can map any data fields needed and then click save to start the export.

Progressive Profiling Settings
With progressive profiling, you are able to import registrant's information automatically when they visit the landing page of your content. If you already have a registrant's information, the progressive profiling will automatically fill out the registration for for them.
Registrants will need to be recognized by BigMarker in order to trigger progressive profiling. You can do this by either redirecting a registrant here, such as through an Exit URL, or by including their email in the URL for the landing page.
Similar to the other settings for export, you'll map which BigMarker fields correspond to which field in Salesforce.
