Using the classic admin? Click here to learn where you can find the waiting room settings.
The waiting room is the holding area for your registrants that opens up just before the scheduled start time. Users can enter, interact with videos, live chat and sponsor banners, then be automatically redirected into the live room when the session begins.
Waiting room settings
To find the waiting room settings, go to the session admin and then Pages > Waiting Room. The settings for the room are immediately available, and to open up the editor, click on Edit Waiting Room.

After enabling the waiting room, you'll see a set of new options appear:
- When can attendees enter the waiting room?
- Set this to either exactly at the start time, 15 or 30 minutes before the starting time, or any time immediately after registration.
- Automatically open session at the scheduled start time
- Decide whether you want to start the webinar automatically, or press go live manually in the room. "Starting" means that the waiting room closes, and all attendees will start to see the live audience experience.
- Allow host to bring attendees in from waiting room individually
- With this turned on, you can individually bring in attendees to the live audience experience without having to open the webinar for everyone. When this is enabled you'll see a new option for each registrant in the host control panel

- With this turned on, you can individually bring in attendees to the live audience experience without having to open the webinar for everyone. When this is enabled you'll see a new option for each registrant in the host control panel
- Public Chat in Waiting Room
- Show the chat panel in the waiting room and allow attendees to participate. Note that the chat will open at te start of the preparation time that you have set.
Customizing the waiting room
In the top right of this page in the session admin you'll see an Edit Waiting Room button. Click this in order to start changing the design, layout and content of the waiting room.
You'll find a few options for updating the waiting room:
- Content - Choose the standard waiting room or use an iframe. The standard waiting room allows you to customize the logo, text, countdown and exit link
- Design - Configure the text color, background image or background color
- Video & Audio - Add media files to play while users are in the waiting room, including audio for dial-in attendees

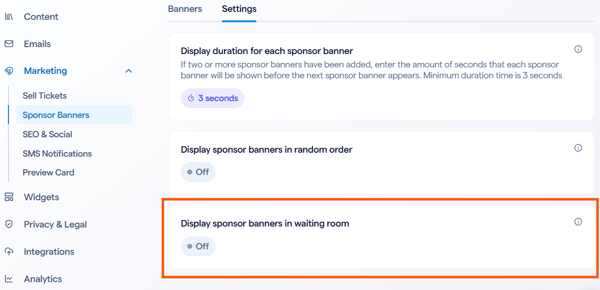
Sponsor banner in the waiting room
You can also allow your sponsor banners to appear in your waiting room. In the Settings tab of the sponsor banner settings, you'll see a setting to show them there. This is an all-or-nothing setting, where turning this on will show all banners you have added.
Waiting Room settings in the classic admin
In the webinar dashboard look for the Waiting Room section in the left-hand navigation. Click on that to see the settings for the waiting room and how people will enter into the webinar.
