Using the classic admin? Click here to learn where you can find the RTMP settings.
In any BigMarker webinar, you can use RTMP to stream into the session and broadcast out to your BigMarker attendees. Whether you just have a single RTMP feed to include as another presenter or your entire webinar content will be broadcast from RTMP, BigMarker makes it easy to set up and prepare beforehand.
Additionally, you have the ability to use RTMP to broadcast your BigMarker webinar to another destination, such as Facebook., YouTube, LinkedIn or even another BigMarker webinar.
Some settings found in this article are only available to Enterprise customers. For more information contact sales@bigmarker.com or your customer success manager.
Once configured, the RTMP stream require no further setup on BigMarker. Once you start streaming, it will appear in the webinar room and Studio.
Table of Contents:
1. How to Access the Stream Key and Stream URL
2. Native RTMP & Multiple Streams
3. How to Stream a Camera Feed utilizing a RTMP
4. Outbound RTMP Stream from BigMarker
5. How to Stream Out to Various Destinations
6. Stream out to a Separate BigMarker Event
7. Adding Live Interpretation while Streaming with RTMP
8. Pause or Switch Your RTMP Feed without Disturbing Your Presentation
Important! We recommend the following settings for RTMP:
Resolution: 1920x1080
Frame rate: 25-30 fps
Video bitrate: 3500Kbps or 3.5mbps*
Audio bitrate: 256 kbps
Additionally: H264 encoded video and AAC encoded audio
How to Access the Stream Key and Stream URL
For any RTMP stream you'll need the stream key and URL. These will what you use to bring in an inbound RTMP stream to your webinar. In the Session Admin you'll be able to find all of the RTMP settings under Production > Streaming & RTMP.

You are also able to use the backup stream key and URL. If for any reason the main stream is disconnected, BigMarker will automatically start streaming using the backup feed. It will then stay on this backup feed until that is disconnected. If you are able to, it is recommended to stream to both the main and backup streams simultaneously.
Native RTMP & Multiple Streams
Note: This feature is only available to Events and Enterprise plan holders. If interested in utilizing this feature, then please contact your BigMarker account manager or an events expert at sales@bigmarker.com.
If you have a 4K, 8K or otherwise high-quality stream that goes beyond the quality and resolution maximum of a BigMarker webinar, Native RTMP allows you to stream it directly to your audience. Instead of BigMarker processing the video feed, users will get a direct feed of your RTMP content in the webinar room.
In the RTMP Streaming experience settings, enable Native RTMP Streaming

When using native RTMP - the RTMP stream is the only content that can be shown in the webinar. Microphones, cameras, videos and all other content will not be displayed to the audience.
Multiple RTMP Streams
With Native RTMP you some additional options. First, you can have multiple streams come in to one webinar, then attendees can choose which stream to watch. This is especially useful for live translations, where you present multiple version of the same content in different languages.
Once Native RTMP is enabled, scroll down to view the stream keys for the session. Click the plus icon to add more streams.

Inside the webinar room, attendees have the ability to switch between the two feeds. The labeled stream will appear in the top right hand corner where attendees can click to switch back and forth between the various streams.

Use RTMP Streams as Cameras
Whether it is for a secondary camera or multiple angles of your live event, you might want to RTMP stream individual presenters into your webinar. Instead of the RTMP stream becoming the main content, instead each stream key you add will become another presenter camera.
Instead of enabling Native RTMP turn on Multi-Stream. This will enable the same settings as above where you can add multiple stream keys. These multiple keys will each be their own "presenter" camera, and the name listed in the camera box will be the label that you provided.
If you are not using the multi-stream view, you can also set your single RTMP stream to act as a camera inside of the webinar room. Click on the RTMP settings in the presenter content panel, and switch over to webcam feed.

Once your stream is coming in as a camera, you'll see an option to "mute" the stream. This icon in the bottom right will allow you to enable and disable the stream while the webinar is ongoing, without having to completely shut down the incoming RTMP feed.

Outbound RTMP Stream from BigMarker
You can stream your stream out to various destinations like Facebook Live, Youtube Live, LinkedIn Live, etc., at the same time (Learn here where to find your destination’s Stream URL and Stream Key). Reach greater audiences by streaming to two or three destinations at once, creating a unique opportunity for attendees to listen in on whatever platform they choose. Link to YouTube Live outbound stream:
How to Stream Out to Various Destinations
Inside of the Studio, look for the Go Live button in the top right. This is also available in the preview room. Here you can add the stream key and URL for your destination.
Click on Add Destination to add a new stream, or click the gear icon to set your Youtube or Facebook streams.


Once you have this configured, simply turn on the outbound stream to start streaming. The destination stream will receive all of the webinar content, presenters and all.

Stream out to a separate BigMarker Event
From a BigMarker webinar you can easily start streaming to another webinar that is happening simultaneously. These settings will be available both in the live room and in a preview room.
After clicking RTMP Out in the top right corner, click Add Destination, and select Stream to BigMarker from the tabs at the top. Use the dropdown menus to choose the webinar, which will include all webinars currently live or schedule to go live during the duration of the session you are in. If the webinar has been configured for multiple streams you'll also have the option to select which stream key. Click Connect Webinar when finished.

Adding Live Interpretation while Streaming with RTMP
You can combine the above steps all in one to have your main event’s RTMP stream streaming in the webinar room while simultaneously having other streams with an Interpreter streaming into the main room interpreting different languages.
For setting this up, you will need at least 3 webinars:
- Presentation webinar - Where your presenters connect and where the original content comes from,
- Translation webinar - Where your interpretation will take place. This could be an outside destination and not necessarily another BigMarker webinar, and
- Audience Webinar - Where your attendees will join and choose which stream to tune in to.

Before connecting all of the webinars together, you'll need Native RTMP turned on for the Audience webinar and then add the various languages you want to add as the multiple streams.

In your Presentation webinar, you'll want to configure the outbound RTMP streams so that it is streaming out to both the translation and the audience webinar.
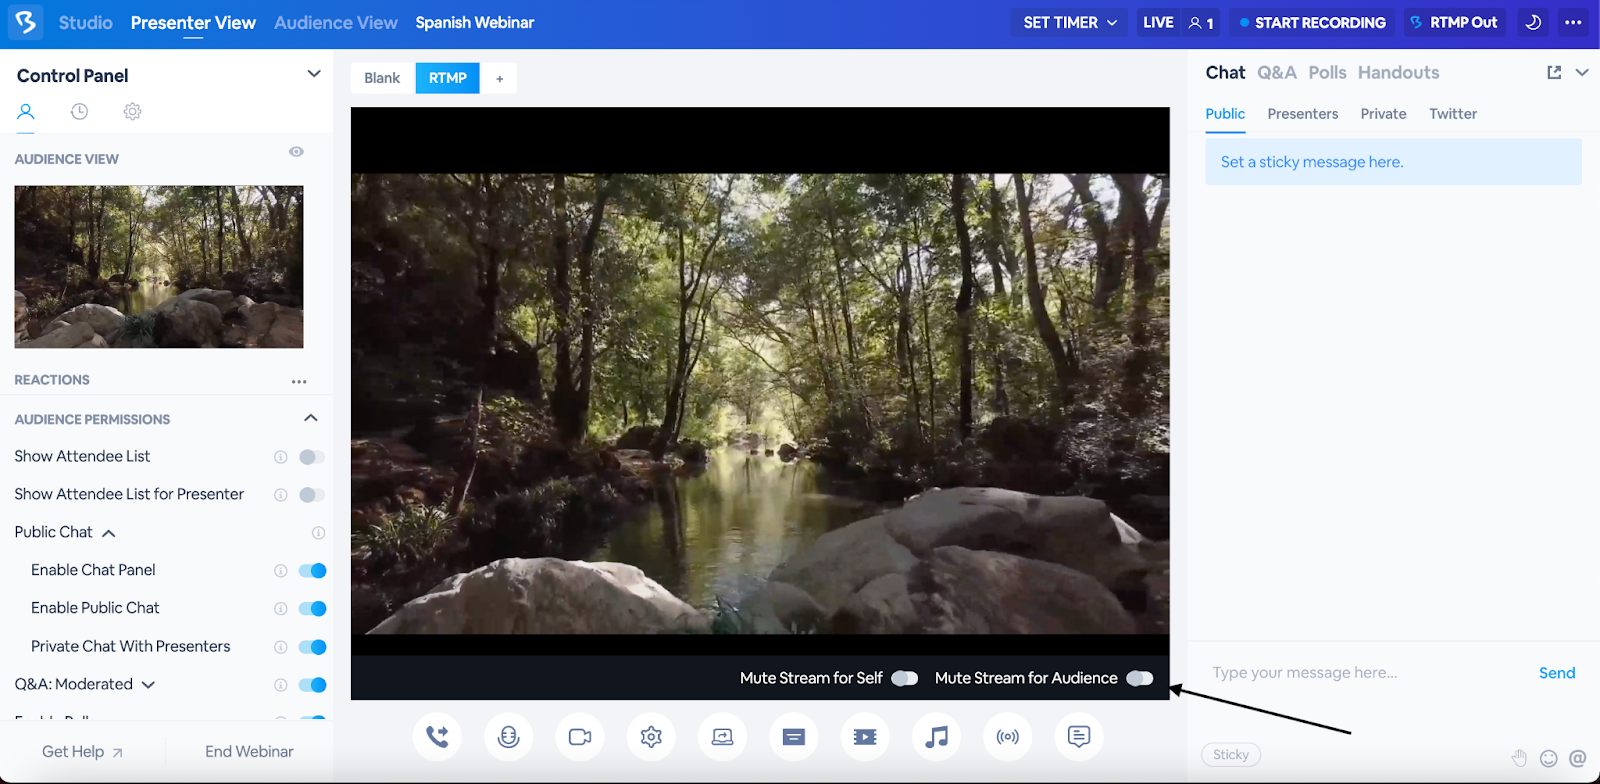
Once the streams start, in the Translation webinar the presenter should turn on Mute Stream for Audience at the bottom right hand corner of the content window. This way, a presenter can be on microphone to provide translation, and attendees will only here this presenter and not that original content. This webinar will also outbound stream into the Audience webinar, but this time to the other language stream.
Once you are up and running, users will again see an option to select which stream to watch inside of the webcast room, or inside of the companion app
.png?width=300&height=649&name=Image%20from%20iOS%20(1).png)
Pause or Switch Your RTMP Feed without Disturbing Your Presentation
Instead of having to turn off your RTMP stream off-platform, you can leave it active in the background while you display other content.
Session admins can utilize the content tabs at the top-left of the presentation screen to show other content while the RTMP Stream is active:

Previously, Incoming RTMP streams would always take the place of the presentation content. With this new update, you can configure the RTMP stream to be either the presentation content or a webcam feed in the webinar room. With the webcam feed option enabled, you can offer side-by-side streaming of your RTMP content along with your screen share or directly uploaded video to enhance your event experience.
If you are using the default RTMP experience, you can also get the stream keys and URL by clicking on the RTMP button inside of the Studio.

RTMP Settings in the classic admin
On your webinar dashboard, click on the RTMP Stream Keys section . Copy the key and URL from these settings and paste them into your broadcast software.
