Note: This feature is reserved for Event Package plan holders. If interested, please contact our Event Experts at sales@bigmarker.com or your customer success manager.
Exhibitors can now create meeting rooms and conduct meetings within their booths. This enables exhibitors to meet one-on-one with interested leads without waiting until after the event, which increases both conversions and ROI for event partners.
Hosts can also pre-schedule meetings with potential customers or job candidates using booths, making it a versatile tool for your marketing and recruiting needs.
In this article, learn how to build, customize and schedule meetings in your expo booth.
Note: To review how to create Expo booths, click here.
How to Schedule Meetings In Your Exhibitor Booth
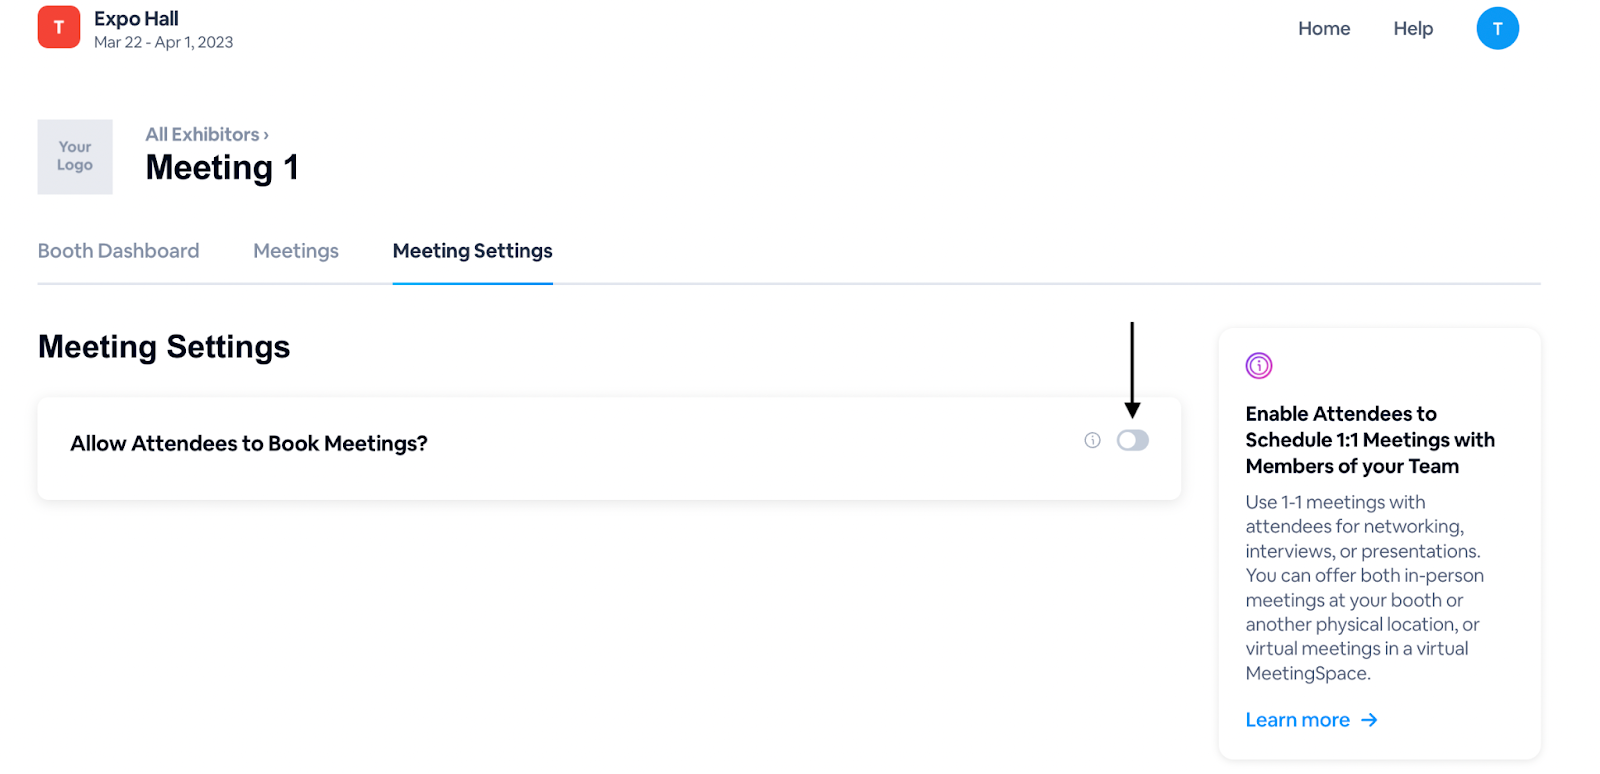
1. Navigate to your booth dashboard, then select the Meeting Settings tab

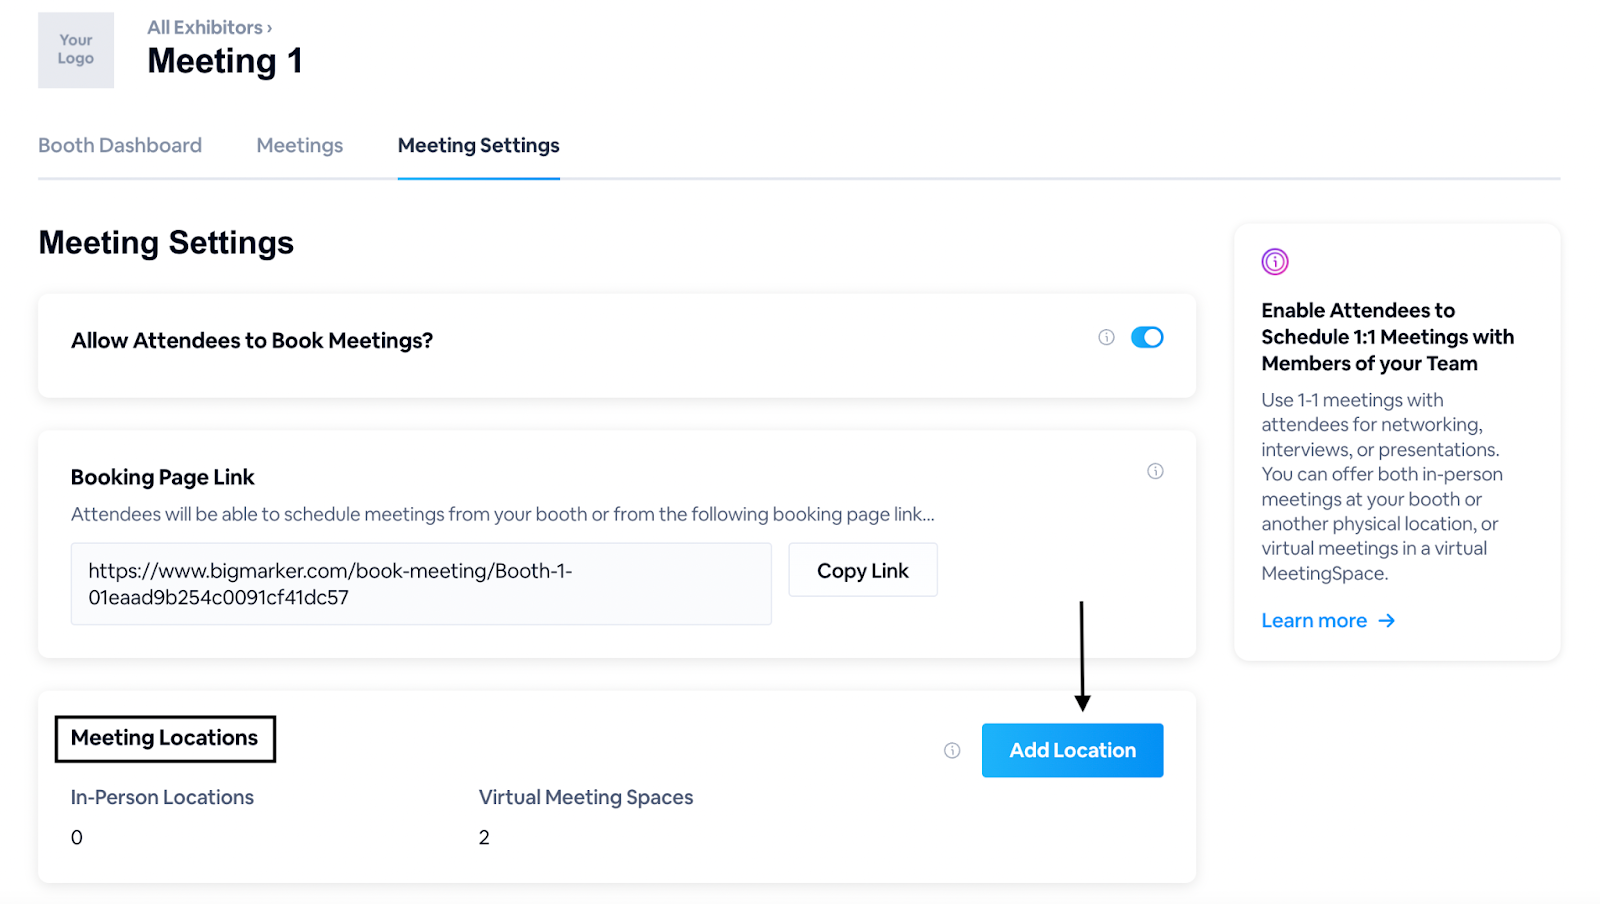
2. Toggle Allow Attendees to Book Meetings? ON.
From here, you can adjust settings and permissions for your meetings.
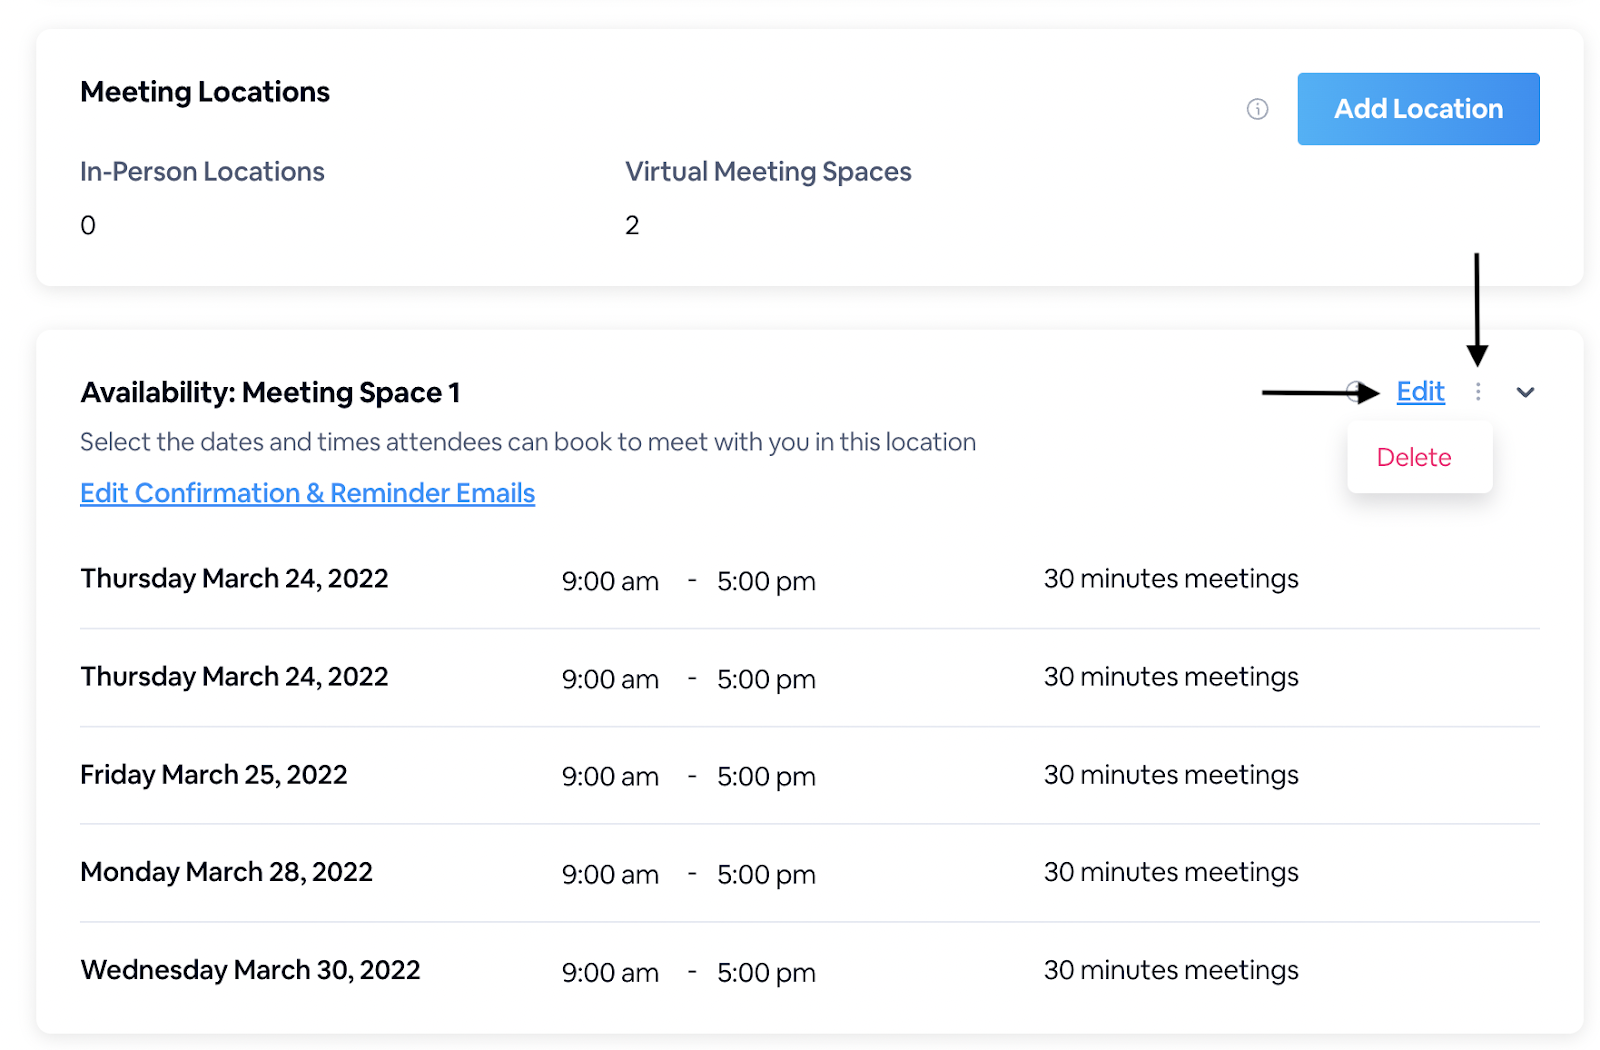
First, create the meeting’s location. To do this, scroll to Meeting Location section and select Add Location.
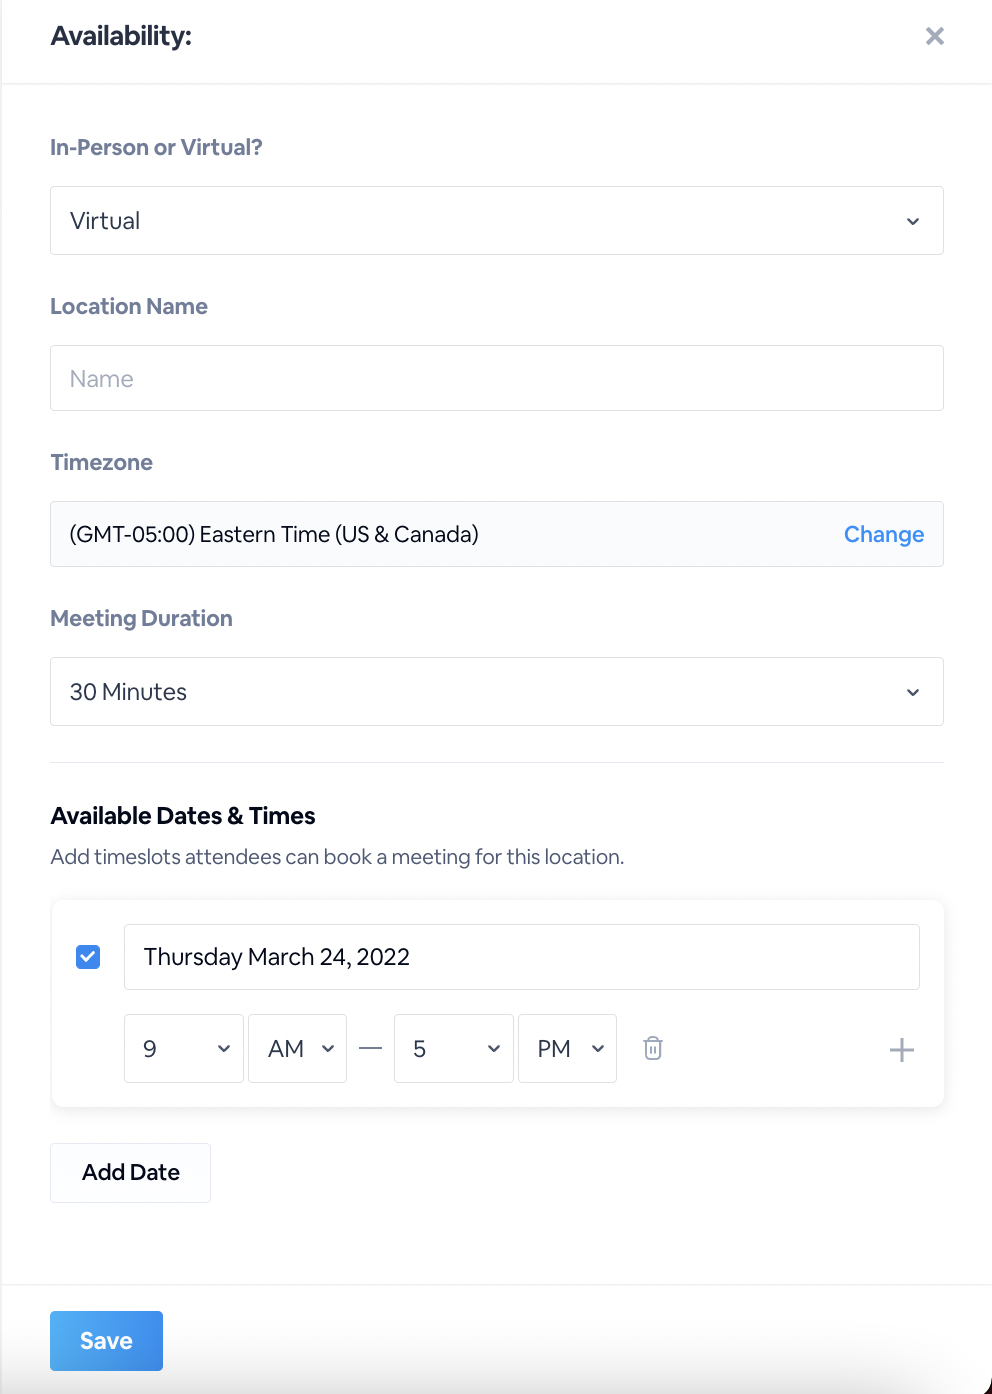
Then set the meeting's location by completing the following prompts:
- Select whether the location is Virtual or In-Person
- Under Location Name, give your meeting a title.
- Enter the time zone of the meeting
- Under Time Duration, enter the length of the meeting.
- Under Available Time and Dates, enter proposed dates and times.
- Click Add Date to add more times and dates
- To account for any breaks, schedule a meeting that will serve as your break time. For example, if attendees can schedule a 30-minute meeting any time from 9 AM-5 PM, but you want to take a break at 6 PM, schedule another meeting from 6 PM to 7 PM.
- Click Save to complete.
Once saved, the Meeting tab will populate with available time slots. You can edit the meeting if needed by clicking Edit or delete the meeting by selecting the three horizontal dots, then Delete.
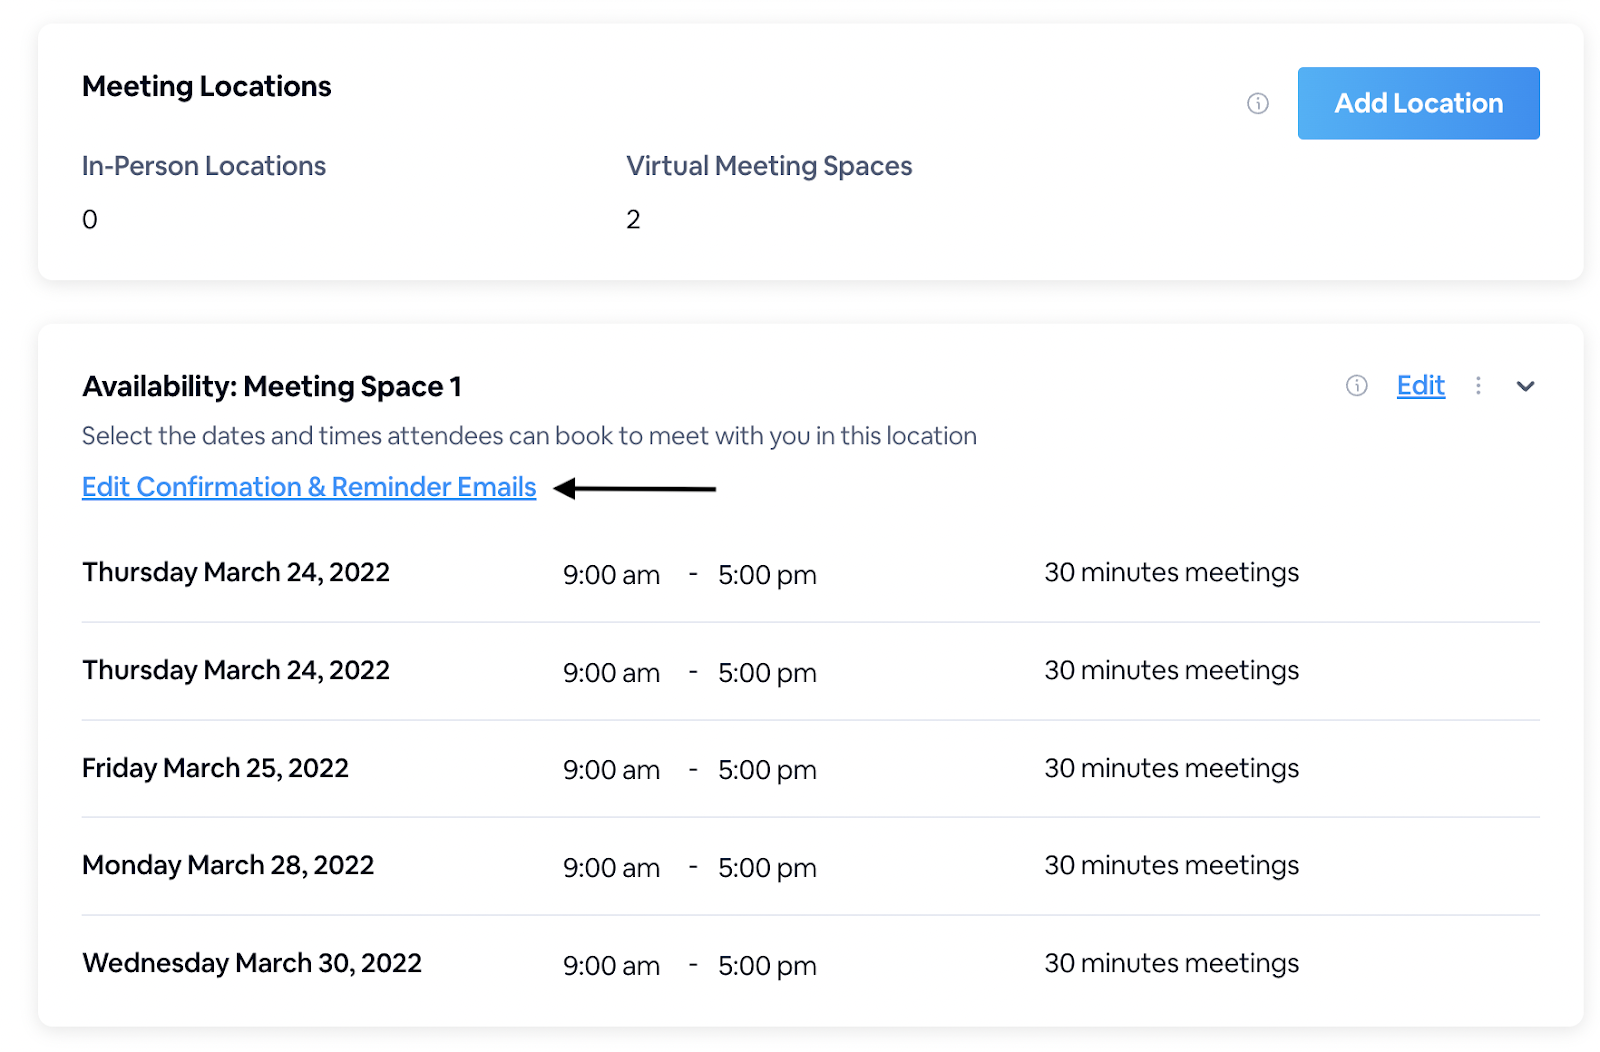
You can edit the confirmation and reminder emails for your meeting as well. To do this, select the Edit Confirmation & Reminder Emails (shown below). From there, you'll proceed to an email builder, where you can schedule, design, and edit confirmation and reminder emails for your meetings. (Learn more about creating automated emails on BigMarker here.)
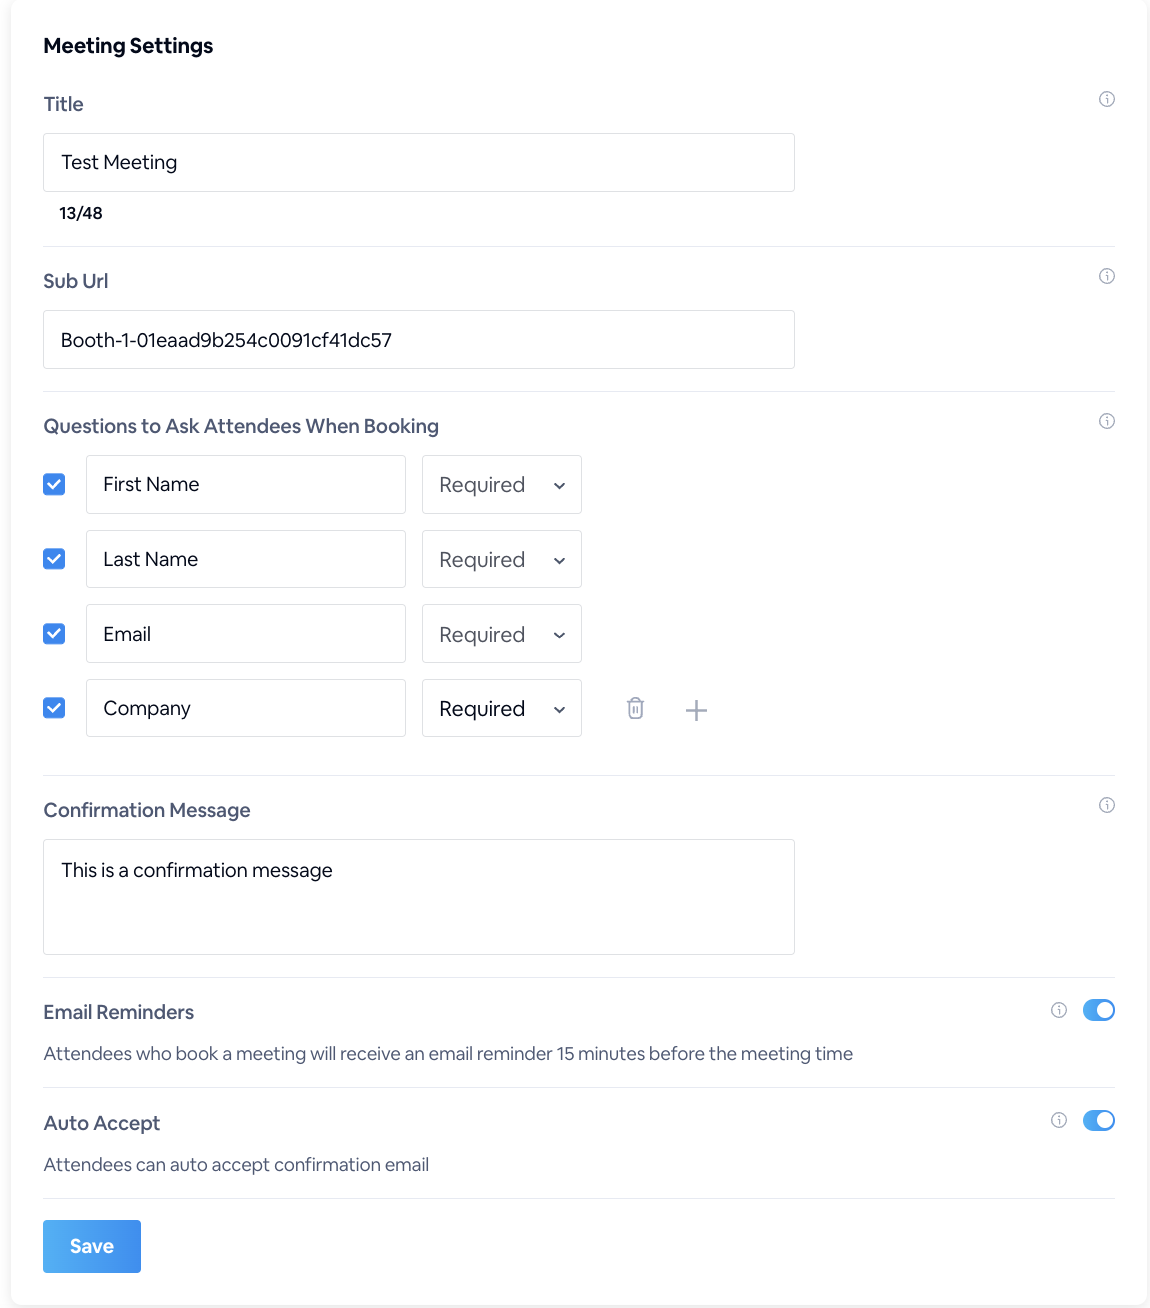
From there, navigate to the next section of Meeting Settings, where you will have the ability to customize and create the custom messages your attendees will receive when confirming a meeting with you. Click Customize at the top right-hand corner.

Customize your meetings message by the options below:
- Title of the meeting
- The Sub URL (if desired) (Note: If the Sub URL is changed, then the Booking Link will be changed too.)
- Questions to ask Attendees when Booking a meeting. There are a few standard questions pre-set to ask that you can change, enable on/off, or add more on.
- Make questions required or optional. Note: Any question that does not have the trash can icon is not able to have its required status changed.
- Confirmation Message
- Enable on Email Reminders for attendees 15 minutes before the meeting
- Enable on auto accept emails, where attendees will automatically have the confirmation email accepted on their behalf.
- Click Save when finished
This will set up your meeting space location and scheduling messaging. You will be able to view this meeting under the Meetings tab.
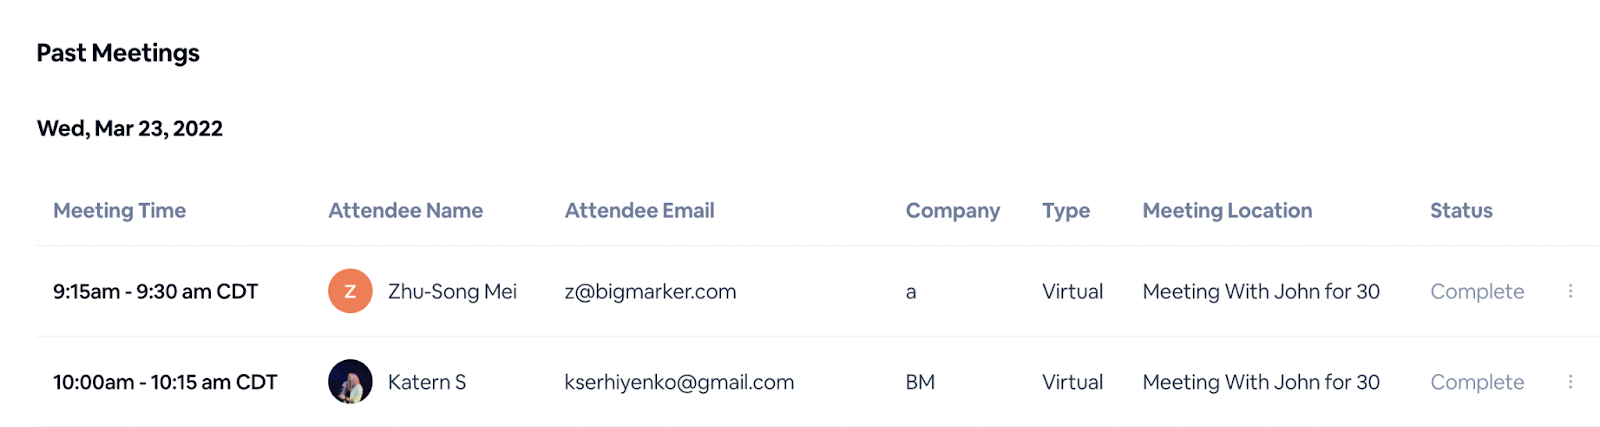
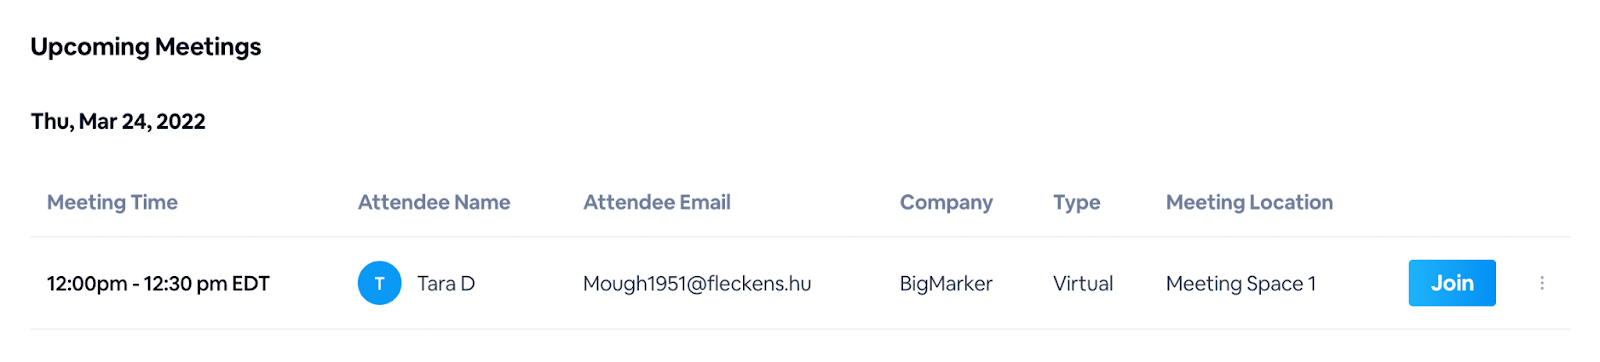
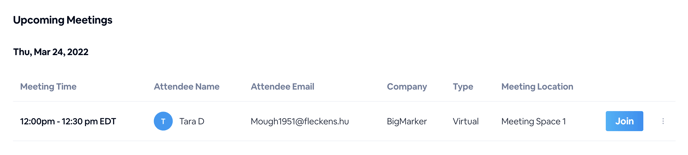
The Meetings Tab
The Meetings tab lists all of the new, upcoming, and past meetings hosted in that booth.
For each meeting, you can see the date, time, included attendees, the attendee’s email and company, the type of meeting, and the meeting location. Here, you can also view the status of each meeting and deny meeting requests if needed.

How can I jump into live meetings?
You can also join live meetings by pressing the Join button (upcoming meetings are listed under the Upcoming Meetings section).
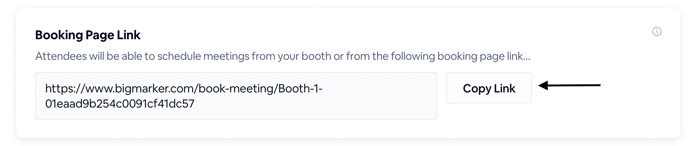
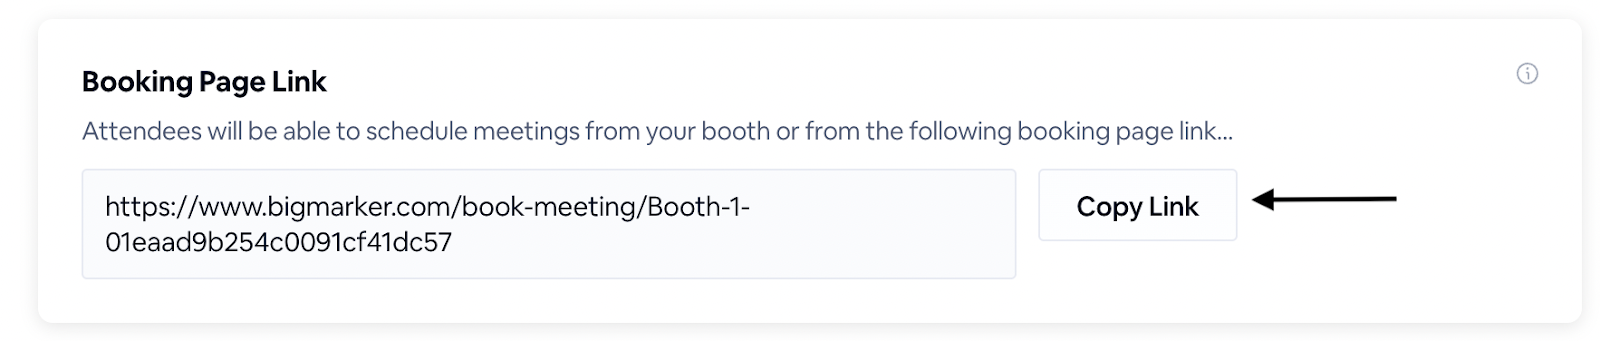
How can I send scheduling links to my booth visitors?
To send a scheduling link to attendees, select Copy Link under the Booking Page Link, then send it to your attendees via your booth's Chat Panel or Private Chat. You can also include this link in the Offers section of the booth, so attendees can schedule meetings at any time.
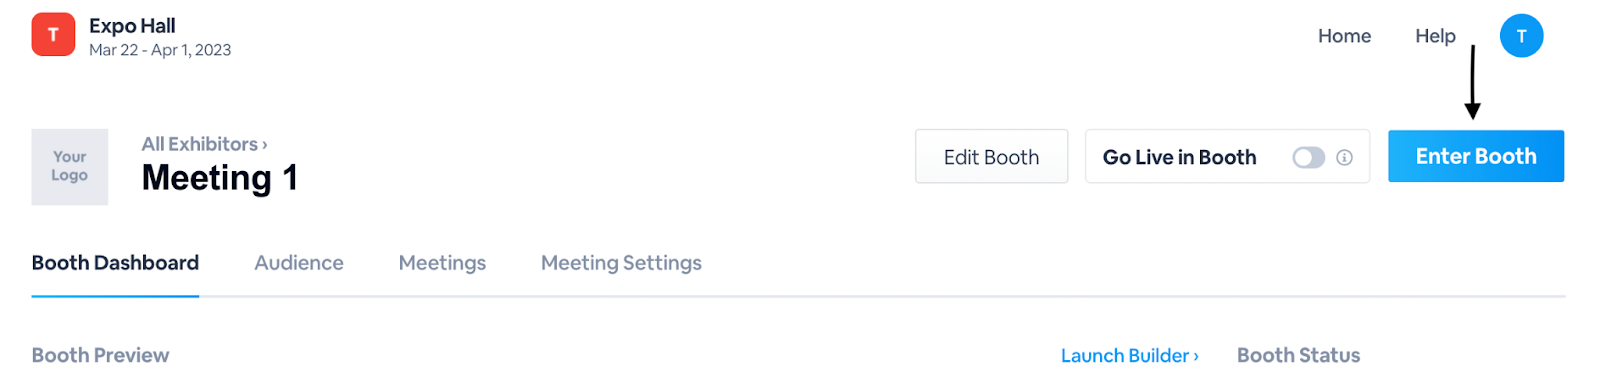
To Enter the Booth
To enter the booth, navigate to your booth's dashboard, then select Enter Booth. When entering the booth, this will be the main location for Exhibitors to chat with attendees and enter in the meeting’s booking link in the Offer sections for attendees to set up meetings.
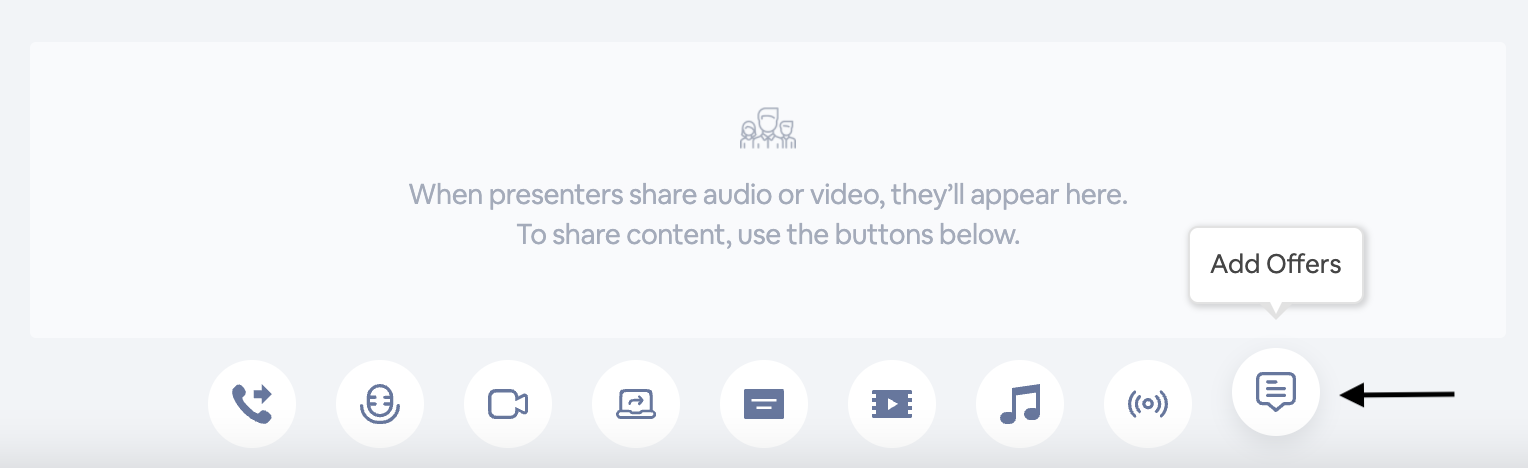
To add pre-loaded Offers to your Booth, follow the instructions here. You can also add your Booking Link to the Offer section within the Booth by clicking Add Offers on the bottom engagement panel.
When entering the booth, exhibitors will have the opportunity to conduct a quick system check (What is covered in a system check can be found here) before entering the Booth. It is important to note that when Exhibitors enter the booth, the booth is separate from the meeting room. Meetings are only accessible by clicking Join on the Meetings tab.
When attendees go to schedule a meeting, they will click the Booking Link and be redirected to the first steps in the scheduling process. Watch below to see a video of this in action:
In this video, learn how to add meeting links to offers in your expo booth – and how attendees can book meetings in expo booths.
FAQs:
How can I jump into live meetings?
- You can join live meetings by pressing the Join button (upcoming meetings are listed under the Upcoming Meetings section).
How can I send scheduling links to my booth visitors?
- To send a scheduling link to attendees, select Copy Link under the Booking Page Link, then send it to your attendees via your booth's Chat Panel or Private Chat. You can also include this link in the Offers section of the booth, so attendees can schedule meetings at any time.