The webinar dashboard has been upgraded to the Session Admin. The new interface provides a completely refreshed & streamlined experience to managing your virtual session. Click here to learn more.
The classic dashboard is a legacy feature and may be missing features available in the Session Admin.
Managing your webinar
After creating or visiting your webinar, you'll be directed to the dashboard of your webinar. The top navigation menu will include tabs for Edit, Presenters, Design, Emails & Invitations, Manage Webinar, Automation, and Integrations. You can also enter your webinar from this dashboard.
In the Manage Webinar tab, you will be able to view analytics and reporting, manage webinar registrations and customize registration fields. You will be able to access the SEO/Social Sharing tags, edit the confirmation page and many more things.

In the Edit tab you will be able to edit the webinar details, webinar size, sell tickets and manage privacy settings.
Pro-tip: If you're hosting a Live webinar this is where you will find editing options for Chat and Q&A, dial-in and advance settings.

In the Presenters tab you will be able to edit and add presenter information such as name, profile picture, bio and contact information for presenters. You can also manage presenter access from this page, and access each presenter's unique Presenter URL in order for them to enter the webinar.

In the Design tab you will be able to manage design options for your landing page and webinar preview card. You will also be able to edit conference room branding here. You can view your landing page at any time to get a preview of your design edits.


In the Emails & Invitations tab you will be able to edit and schedule emails, reminders, and notifications for your webinar. In the lefthand navigation menu, you can select from Getting Started -- which is a good jumping off point for basic invitations and reminders -- Email Invitations, Reminders & Notifications, General Emails, Presenter Notifications, Presenter Reminders, Invite & Registrant List, and ICS File.

In the Automation tab you'll be able to add automations to your webinar such as polls, pre-loaded videos and hangouts. You can manage the automation workflow and timeline, test out your automations and even pre-load chat conversations to post during the webinar as if they were happening in real-time!

In the Integrations tab you will be able to integrate with the apps below and 500+ more through Zapier.

To access your webinar landing page click the View Landing Page button on the righthand side of your webinar dashboard toolbar. This is the page people will see when they come to register for, and attend your live webinar. This is also where your recording will post if you choose to publish your webinar recording.

Entering your live webinar
As a host or an admin, you'll be able to enter your webinar 60 minutes before it starts. Use the steps listed below to enter your webinar.
- Go to your webinar landing page: Use the personalized link sent to you via email or log into your BigMarker account to access your webinar landing page.
- System requirements: Hosts should have an internet speed of 10+mbps for both upload and download speeds for an optimal webinar hosting experience. Also, please make sure you are on an updated version of Chrome, Firefox, Safari or Edge. You can use this test page to check your speeds.
- Click the Enter Webinar button. You can access your "Enter Webinar" button from your webinar landing page.
Hosting your webinar
Once you enter your webinar, the webinar is "live." This means that anything that you share (i.e. webcam, mic, presentation slides, videos, etc.) will be visible/audible to your audience (if anyone is in the room). We highly recommend testing your mic/camera/presentation etc. before your audience enters the room.
- If you'd like to record your webinar, you must click Start Recording button at the top of the webinar on the righthand side. It will NOT auto-record.

- The default settings for attendee mics and webcams is off. To allow them to share their mics/webcams you must to enable them. You cannot turn their mic or camera on for them, you can only enable their ability to share them. You can learn more about camera and mic settings here. For webcast webinars, you are unable to enable attendee mics and cameras.
After the webinar
The recording will post on the Manage Webinar tab on your webinar page. You will be alerted by email when the recording is available. You must Publish the recording in order for the recording to be viewable on your webinar landing page.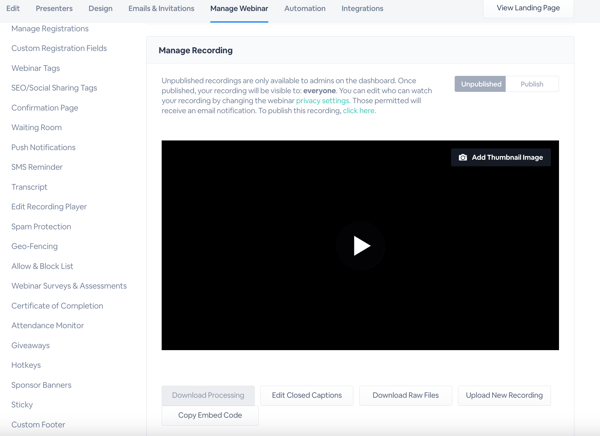
Additional tips & suggestions
Before the webinar, it is important to review all of our system requirements and video guides to ensure the best possible experience in your BigMarker webinar room.
- If you are planning on attending from a school, large corporation, or religious institution, make sure you are not behind a Firewall, or open the necessary ports if you are.
-
Ensure you have the latest version of your web browser, whether that's: Chrome, Firefox, Safari, Edge, or Opera.
- Attendees can use Internet Explorer 11, however, you will need webcast mode enabled. But hosts cannot use Internet Explorer 11, and we do not recommend anyone uses it. Microsoft no longer supports or updates IE.
- A consistent high-speed connection with speeds of 10 mbps+ is required (15 mbps is optimum if you will be sharing your screen, video or presentation). Test your speed here. If possible, a wired connection is much more stable and will help prevent dropped connections and interference.
- To prevent connection drops and packet loss please review this article.
If you have any questions, please email support@bigmarker.com