Automated Webinar
Simulate the live experience by automating your webinar
Automated Webinars are pre-recorded webinars that include all of the engagement features typical of a live session, including polls, Q&As and a live chat. This gives guests the interactivity of a live webinar, while giving hosts the freedom to host webinars more frequently with minimal supervision
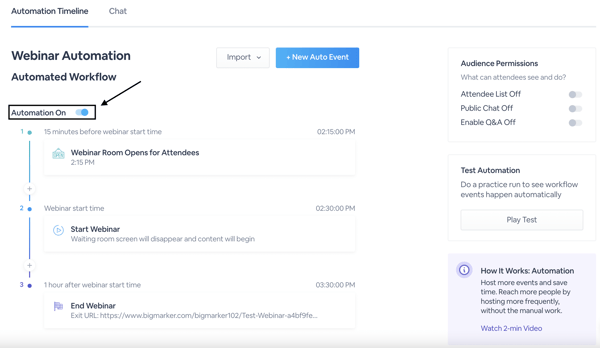
Automated webinars are configured using the automation timeline, where you add specific actions and events to happen at specific times relative to the start of the session. Automatically play videos, send chat messages, post offers, poll your audience, and take many other actions using this timeline.
How to create an automated webinar
At a basic level, automated webinars are no different than live webinars with automation. Creating an automated webinar will turn on some settings automatically to make it easier to set up, but any live webinar can use the automation timeline.
1. On the Host Dashboard, select Create a Webinar.

2. When creating a webinar, select the Automated Webinar type and fill out the webinar details.

3. After putting in the basic details and creating your webinar, you'll be taken immediately to the automation settings in the webinar dashboard

The automation timeline
In the timeline, you'll add events that trigger at specific times during the live webinar. To add your first event to the workflow, select New Auto Event. You'll have a number of different options of events to add to the timeline such as videos presentations, handouts, chats, and more.
Note: If you've already hosted an automated webinar and want to use the same workflow in this session, select Import to add your past workflow from a previous webinar or CSV file to this webinar.

Once you select an event, a right-hand drawer will open with further options> Here you upload any necessary content for the event, configure any additional text or settings, and set a time for it to happen. For example, if you want a video to play 30 seconds after your webinar begins, go to Play the Video..., then set it to play 0h, 00m, 30 seconds after start time.
Note that you can also play full videos or portions of videos, using the prompt shown below.

Specific options for automation events
Some automation events allow some additional controls to be part of that automation:
Captions can be added to automated videos - If your channel has the ability to provide closed captions then you are able to pre-set your captions of an automated video. Turn on closed captions for the automated video, then click on Edit Captions. from here you are able to either process or upload your own captions for each video. This is a great option to ensure that your captions match your video content exactly, rather than relying on the live captions.

Pick from existing pre-loaded content - For polls, videos, offers and handouts, you can upload your content in the pre-load section of the webinar, then easily choose which item to use in the automation.

Chat sender information - For any automated chat, you can specify which presenter is sending it.

Important: The webinar start and end times are always going to be automated.
How do I adjust settings for my automated webinar?
The rest of the settings available in the webinar dashboard are essentially identical to that of a live webinar. You'll be able to find all of the same settings in the same place for automated webinars.

Frequently Asked Questions
Can hosts share their camera/mic in an automated webinar?
- Yes! Hosts can "go live" at any point in the webinar. Once the webinar is live, select the microphone and/or camera icon below to share audio and video, respectively.

Can hosts automate a live webinar?
- Yes! Learn how to create a live webinar here. In its dashboard, select the Automation tab. From there, follow the same steps shown above to create an automated workflow.

Can hosts turn Automation on and off?
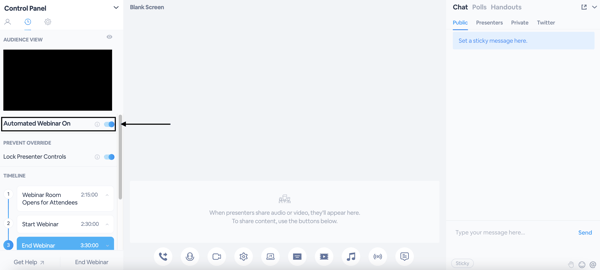
- Yes! Hosts can disable automation both inside and outside of the webinar room.

