SAML, or Security Assertion Markup Language is an authentication standard used to identify and verify users across platforms and applications. For most SSO providers, SAML is used to provide that authentication.
Before this update, you could connect a specific SSO service to your channel as long as it was available from the options on BigMarker. Now you can use SAML to integrate with any SSO provider that uses SAML.
The settings below enable your channel admins to use your SSO to log in to BigMarker, but by default they are still able to log in to BigMarker normally.
If you want to restrict this so that admin must use the SSO in order to sign in to BigMarker, contact your customer success manager to set this up.
Adding channel admins
For anyone to have access to the channel, they first must be added to the channel as an admin, host or presenter. Visit the channel settings page and go to the billing section. Scroll down to find the channel hosts section, and add your hosts here if they have not been added already.

The email address used for these BigMarker accounts must match the one from your SSO database.
Configuring the SSO integration
In the channel settings you will find a new section for Channel SAML SSO Settings. Once you turn on the feature, you will first be shown two fields that you need to copy and paste into your SSO application::
- Single sign on URL (SAML Assertion Consumer Service (ACS) URL)
- Audience URI (SP Entity ID)
These URLs will ensure that your SSO application communicated with the correct BigMarker channel.

After this, you will need to match the BigMarker Fields to the SAML Response Keys. The format for these fields may change from service to service, but commonly you'll find the following for email, first name and last name, emailaddress, givenname, & surname
The response keys must be in a specific URL. Regardless of your service, that URL will look the same until you get to the attribute name, starting with
http://schemas.xmlsoap.org/ws/2005/05/identity/claims/
So for the commonly used examples listed above:
http://schemas.xmlsoap.org/ws/2005/05/identity/claims/emailaddresshttp://schemas.xmlsoap.org/ws/2005/05/identity/claims/givennamehttp://schemas.xmlsoap.org/ws/2005/05/identity/claims/surname
Finally, you’ll need to add the XML metadata file from your SSO application. This can either be an uploaded file or a URL. You will need this in order for the SSO application to authenticate that BigMarker is a valid site.
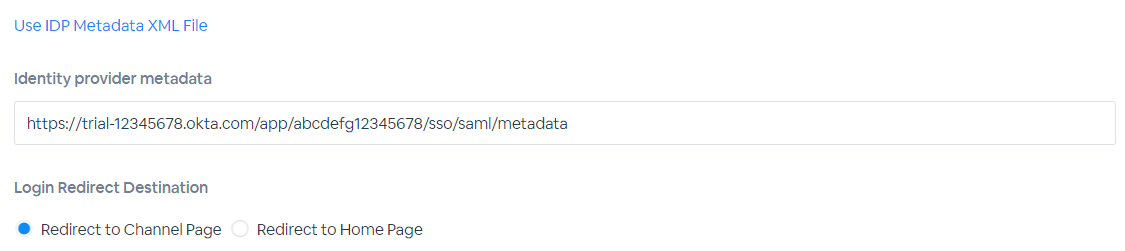
The last option you have is to determine where your users will go once they log in, and you can choose either the channel homepage or the logged-in home dashboard.
With these all configured your channel admins will be all set to start using your SSO application to sign into their BigMarker accounts.