Note: Currently, this feature is an add-on for Enterprise plan holders and Virtual Events
Virtual event hosts can now provide additional on-demand multimedia content, documents, videos and PDFs to their attendees with Media Hubs, an event module where you can publish content for months after your live event ends. This allows hosts to extend the shelf life of their event’s content and maximize their ROI.
Hosts can also use Media Hubs as a central resource for attendees to get follow-up information about the event.
What kinds of Media Hubs are available on BigMarker? Choose between two formats: Video Hubs and Resource Hubs. Video Hubs serve as on-demand galleries for videos and webinars. Resource Hubs have support for articles, podcasts, videos, webinars and white papers, allowing hosts to provide a rich and well-rounded multimedia experience for attendees.
How long is on-demand content available in the Media Hub after my event ends?: Content lasts depending on the Plan you purchase with BigMarker. To learn more about our plans, please contact our Sales team at sales@bigmarker.com
How can I organize information in my Media Hub?: Use advanced features like tagging and filters to organize a high volume of content and help attendees find exactly what they need.
Can I customize my event’s Media Hub? Yes. The Media Hub has the same customizable features as our other modules, like the Networking Center, Agenda, Lobby and more. You can adjust the Header, Title Banner, Content and Link Tabs and more. Watch the video below to see this in action:
Learn how to create your own Media Hub below.
Table of Contents
2. How to Edit and Customize your Media Hub
3. How can I view my Media Hub’s analytics?
4. Integrate your Media Hub with Eloqua
How to Create a Media Hub
1. On your main Event’s dashboard, select Manage Event.

2. From there, select Add Module.

3. Choose between the two Media Hubs formats: Media Hub- Video or Media Hub- Resource.
 4. Select your preferred format, then fill in the rest of the details for the Media Hub in the provided fields. Click Save & Exit when finished.
Once completed, the Media Hub will be present in your virtual event’s dashboard.
How to Edit and Customize your Media Hub
Return to your event’s dashboard and select the Media Hub module.
On the left hand side of the page, find all of the customization options for all the sections to choose and customize for your Media Hub: Header, Title Banner, Title Banner Carousel, Link Tabs, Content Tabs, Categories & Sub Categories, and Custom Code.
Header - Here, you can customize your Media’s Hub header. You can add in a logo image, change the colors of the header’s background and font colors, change the copy on the register and login buttons, and more.

Title Banner - In the Title Banner section, you can customize the area of the Media Hub that attendees see first, the title and its design. Here, you can adjust the title, the description of the Media Hub, the colors for the text as well as any background colors or images.
Title Banner Carousel - The Title Banner Carousel shows the various tabs that are included in the Media Hub. In this tab, you can add images to the carousel, change font colors, add links that redirect attendees to various parts of your events, and auto rotate the carousel as desired.

Link Tabs - Here, you can add external links to your events. Add different tabs and link them to external websites or different modules within your event.

Content Tabs- Here, you can add videos, documents, podcasts, articles and other resources to your Media Hub. Each piece of content is stored in its own tab within the Media Hub.
So in this tab, you will create and add titles to your content tabs, customize their colors and descriptions and add the content. There are four categories to choose from when uploading your content: Files, External Links, Live Webinars or On-Demand Webinars.
File Type: File types can be handouts, PDFs, or other documents that you would like to offer to your attendees. You will need to upload the file for this content type.
On-Demand Webinar(s) Type: Use an On-Demand webinar recording as a multimedia resource in your Media Hub. Show previous live webinars that converted or existing recordings available for viewing. For each On-Demand webinar, enter in the:
- On-Demand Webinar: Use the dropdown menu to select your On-demand webinar
- Automatic pull on demand webinars based on webinar tags: Use your webinar tags that associate your on-demand webinars into your Media Hub.
- In Webinar Tag Name box, select the Webinar Tag Value you'd like to use to pull the On-Demand Webinars from.
- Show All On-demand Webinar from Series: Select the series with your On-demand webinars you would like to pull from
Live Webinar(s) Type: Add your live webinars to your Media Hub as another multimedia resource, that attendees can join straight from your hub. For Live Webinars, enter in the:
- Show all live webinars from Series: Select the series with your Live Webinars you would like to pull from
- Live Webinars button Text: Customize the CTA text for your Live Webinar
External Link Type: Redirect your attendees to your own website, an outside file type, or other external locations with this file type. You will need to enter the:
- External Link: The link for your external file
- Save External link file on BigMarker: Opt to save the external link to use in different Media Hubs
Each of the file types will have the same settings to customize:
- Content Title: The display title of the file
- Display Content Title: Display the content title or hide it
- Content Description: A brief description of the what the file is
- Search Keywords: The Keywords to find the file in the search bar
- Preview Image: The image for the file
- Show Preview Text: Ability for attendees to preview the file
- Preview Text: Customize the CTA for previewing the file
- Filter associations: Associate any filters with the content
- Sub category content tab associations: associate the file with any sub-categories in your Media Hub
- Sub-sub category content tab associations: associate the file with any sub-sub-categories in your Media Hub
- Set publish date manually: Display the date you added the file to your Media Hub. This can be done in MM/DD/YYYY or DD/MM/YYYY format
Note: For On-Demand Webinars, you can also click the three dots on the preview image to adjust these settings

After you are done adding your content to your Media Hub, you can customize the accessibility for the hub.
You can also restrict access to content to your event registrants. To do this, check Only allow registrants to view content. When checked, anyone who is not registered for your event — or logged into BigMarker — will see an error message in the notification bar. They’ll be prompted to log into BigMarker or register before accessing the content.
You can customize the text color and background text color of this notification bar.

Below is an example of the error message:

Take this one step further by prompting registration to those who are not registered and trying to view your content. In the Content tab, check off Show registration modal on click. Open registration modal for unregistered users when try to view content, so that those who are not registered will be able to register right then and there.
Watch the video to see this in live action:
Create and track external links within the content tabs. For content types, you can set an external link type where if clicked on, it will take attendees to the external site for additional content. Now, you can track these links by saving them as “files” within our system. Basically, these external links will be trackable so you can see analytics on who clicked the links.

Provide shareable links for all your Media Hub's content, so your guests can post the content to different social media platforms or keep for the future. To do this, scroll to the bottom and enable on Show share link on all videos.

This will provide a Share button at the bottom where once clicked, it will notify the guest that the content's link has been copied. Watch the video below to see this in live action:
If you would like, you can display the content's published date in your Media Hub. To do this, check off Display content publish date and then use the dropdown menu to select if you would like the data to display as either MM/DD/YYYY or DD/MM/YYYY. The content will have its display date below.

If you would like to manually enter your content's publish date, use the dropdown arrow on the content and scroll to the bottom until you see set publish date manually. Check that off, then use the calendar to manually select the date to be displayed.

Categories & Sub Categories - In the Categories & Sub Categories section, you can create different categories and sub categories within your content tabs, then assign individual pieces of content to those categories.

Custom Code - Here, you can insert custom code to add unique designs to your Media Hub.

Once you’ve finished customizing your Media Hub, you can manage its admin settings as well. At the top of the Media Hub editor, click Manage.
From there, you will be redirected to the module’s admin settings. Here, similar to a Series backend, you can look at the presenters, edit any Series details and view your Media Hub’s analytics.
Once finished, your Media Hub will be ready for your virtual event.
How can I view my Media Hub’s analytics?
Now, you can view and download a summary of each document’s total views and downloads. To do so, select the Analytics & Reporting tab, then select Documents Views Report.

Integrate your Media Hub with Eloqua
Now, you are able to integrate your Media Hub with Eloqua to gain analytics on who viewed your documents, which documents they were and if they were downloaded. (Learn how to integrate Eloqua with BigMarker here.) Follow the steps for syncing your account information, and setting up your import and export settings.
You can choose to use these BigMarker fields when setting up your export settings: Content Name (Text), First Download Time (Integer: Unix Timestamp), Download Times (Integer), and First View Time (Integer: Unix Timestamp), to create custom data records to view analytics of your Media Hub. These will be based on their BigMarker ID showing what documents they viewed. Since this is based on the content they view, if an attendee would view two documents it would show as two custom data records within Eloqua.
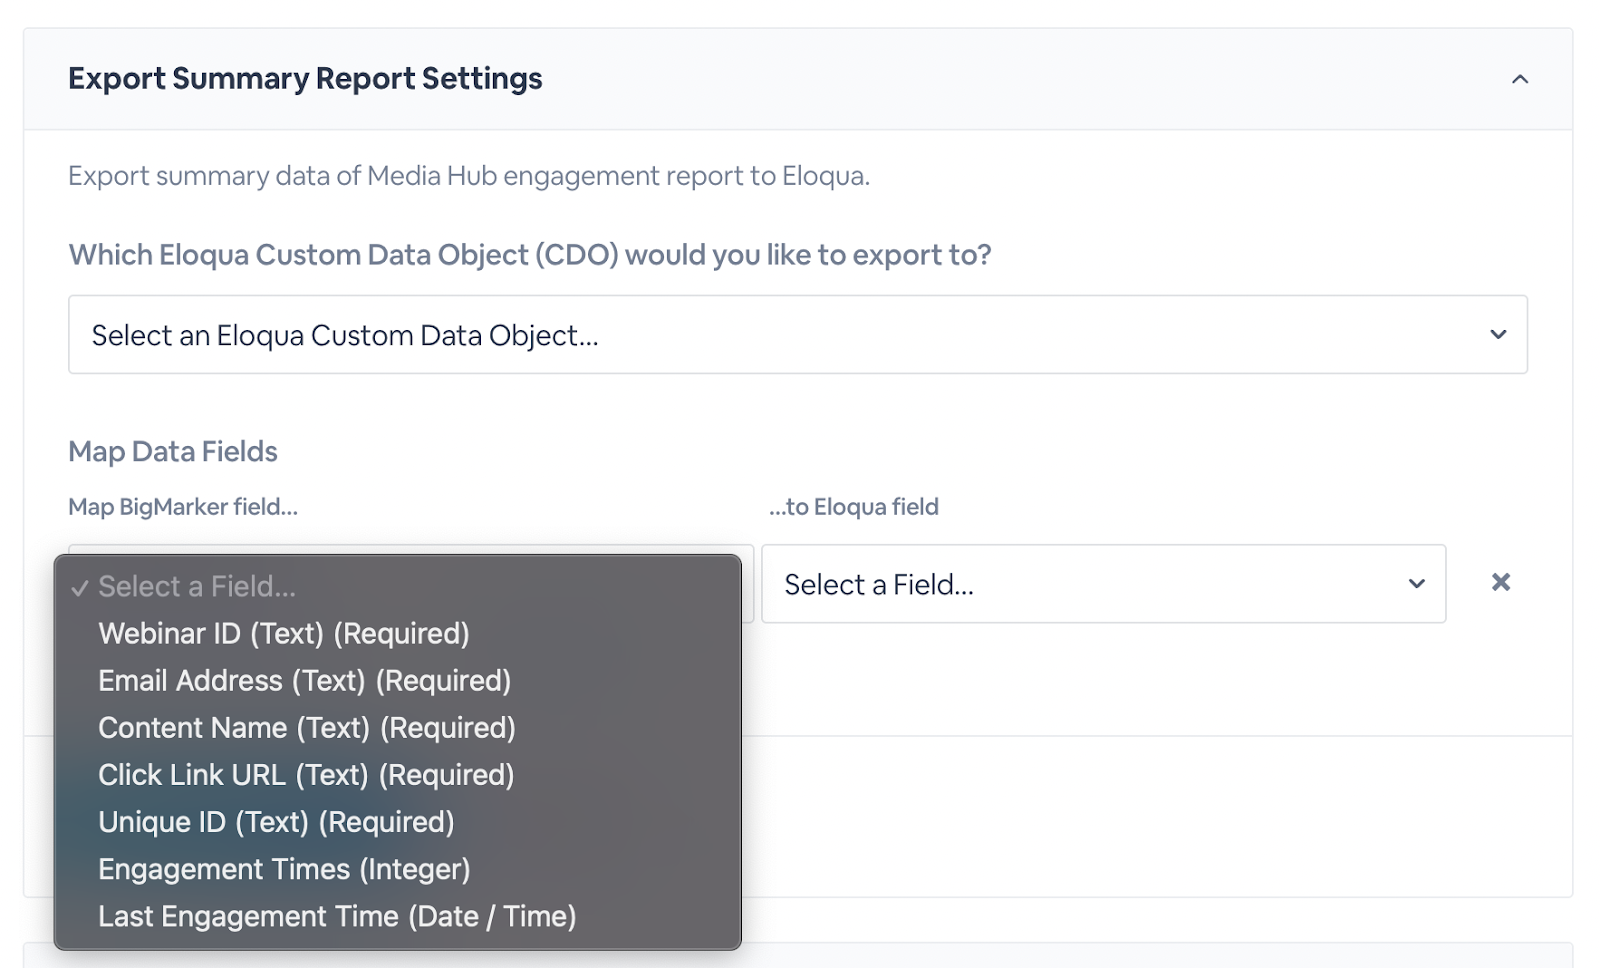
After setting up your export settings, you will proceed to the Export Summary Report Settings section, where you will select a custom data object to export to, then map the BigMarker fields to the equivalent Eloqua fields. You will need to map these required fields: Webinar ID (Text), Email Address (Text), Content Name (Text), Click Link URL (Text), and Unique ID (Text). The Engagement Times (Integer) and Last Engagement Time (Date/Time) are optional fields to map. After, your custom data object will show the below fields’ data.
Integrate your Media Hub with Marketo
You can also integrate your Media Hub with Marketo to gain analytics on who viewed your documents, which documents they were and if they were downloaded. (Learn how to integrate Marketo with BigMarker here.) Follow the steps for syncing your account information.
Under your Export section, find the Export Media Hub Data s Marketo Activities setting, then check off Enable export media hub data to Marketo as activities.
From there, map the following fields: Content Name (Text), First Download Time (Integer: Unix Timestamp), Download Times (Integer), and First View Time (Integer: Unix Timestamp), to create activities in Marketo of your Media Hub engagement. It's important to note that all this information will be recorded per activity, so when a user watches the same video twice or downloads a PDF multiple times, each time will be recorded.
For more information on Enterprise Plans, please contact our Sales Team at sales@bigmarker.com