Use ICS files to ensure that when users register for their events, the event is automatically blocked off on that attendee's online calendar, regardless of which email provider they are using.
BigMarker hosts can use ICS files to ensure that when people register for their events, the event is automatically blocked off on that attendee's online calendar, regardless of which email provider they are using. This reduces the likelihood of guests forgetting to sign in and, in turn, the number of no-shows at the event.
Before we tell you how to add ICS files to your calendar, we'll cover a few basic questions about what ICS files are and how they can improve conversion among your registrants.
What are ICS files?
An ICS file is a calendar file saved in a universal calendar format used by several email and calendar programs, including Microsoft Outlook, Google Calendar, and Apple Calendar. Event hosts manually create these files, then upload them to their event's registration confirmation emails.
While creating ICS files, hosts specify the dates, times, and time zones of their event. So when they are included in registration confirmation emails, the dates and times specified by the host are automatically added as appointments on the new registrant's online calendar, regardless of what email provider they're using.
What if my event takes place on multiple days? Do I need to create multiple ICS files to ensure all the times are blocked on my attendees' calendars?
No! Within one ICS file, you can create different entries for different dates and times. For instance, if your event runs from 9 am-5 pm on Monday and 12-5 pm on Tuesday, you'd create two different entries for those time slots, but they'd be included in the same ICS file.
This way, you can create an ICS file for a 3-day-long event without literally blocking off 72 hours of your attendees' calendars.
Now that we've covered the basics of ICS files, follow the steps below to add them to your event emails:
How to Add Customized ICS Files to Registration Confirmation Emails
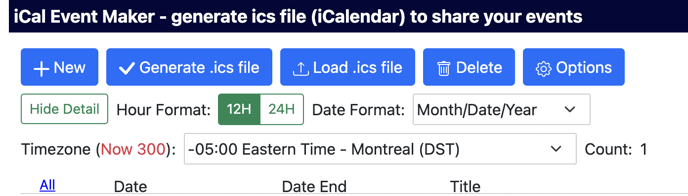
1. Create an ICS file with this generator. (Or use one of your choice.)
2. Under Timezone, ensure the timezone matches that of your event.
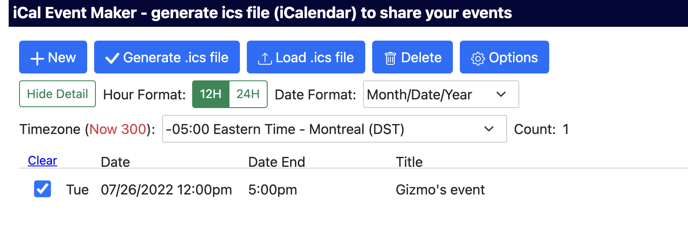
3. Select New.
4. In the pop-up that appears, add the name of your event, the date and time of programming. its description, and the webinar link in the respective fields. Click Save.

5. If you want to block multiple slots on your recipient's calendars (e.g., If you're hosting sessions Monday from 4-6pm and Tuesday from 9-11am , repeat steps 3 and 4 for each additional time slot. Click Save and Close.
6. Once you've finished adding all of the time slots you'll include in your iCal, select Generate iCal. An output ICS file will download to your device.
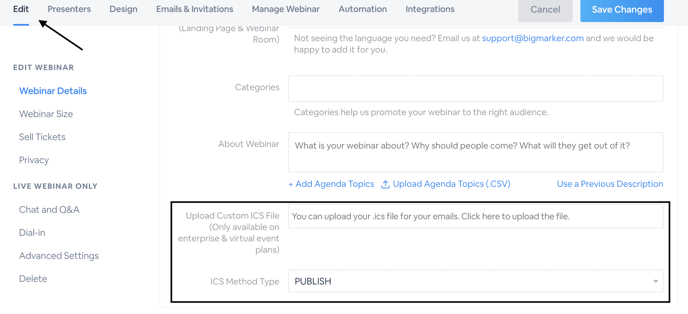
8. Scroll down and upload your ICS file in Upload Custom ICS File (Only available on enterprise & virtual event plans). From here, you can select whether you would like to send the calendar invite on your recipients calendar where they can manually accept or as a tentative meeting.
9. Next, click to the the Email and Invitations tab.
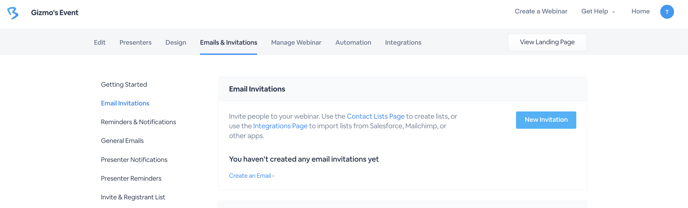
10. The Emails and Invitations tab displays all of the email templates associated with your webinar. Since ICS files are attached to the confirmation email guests receive after registering, we'll add the ICS file to your webinar's confirmation email.
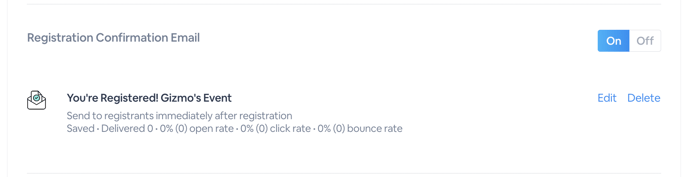
Staying in this tab, scroll down and find Registration Confirmation Email. Select the blue Edit link in its row.
Note: Also make sure the On/Off dial next to "Registration Confirmation Email" is toggled ON. Otherwise, it will not be sent to people who register for your event
11. You'll then proceed to your confirmation email's editor. On the email content section, scroll and find Custom ICS File. The ICS File you uploaded on the Edit section will be attached to the email, and you can click Click here to be re-directed back to the Edit section to change if needed.
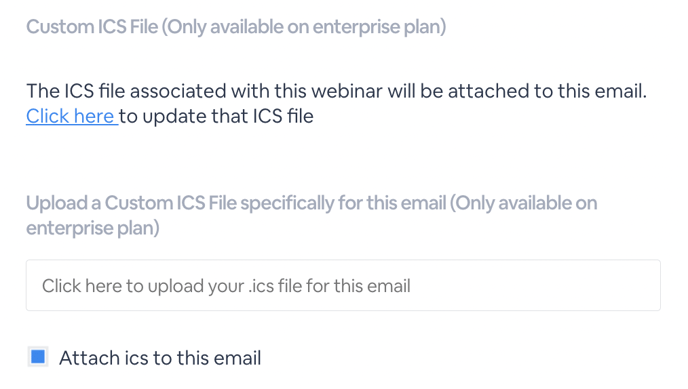
If you would like a different ICS File for the specific email to be included, add the ICS file under Upload a Custom ICS File specifically for this email.
You can also add a ICS file token into your email content if desired.

12. Click Save to complete.
You can show ICS files as attachments on the email or hide the attachment as desired. Click Attach ICS to this email to show the calendar attachment.