Troubleshooting Steps for Microphone Issues while using BigMarker's webinar and virtual events platform.
If your microphone isn’t working on BigMarker, try the following troubleshooting steps. If none of the following work, please feel free to contact your BigMarker Account Manager or Event Producer. If the microphone was working, but then stopped, there could be a network issue.
Here are the recommended steps to take when troubleshooting your microphone:
- Ensure the microphone is not muted
- Check your hardware connection
- Close Zoom, Skype or other background apps
- Close browser tabs
- Ensure the correct input device is selected on Chrome
- Allow BigMarker access to your Microphone
- Restart Chrome or Firefox
- Fully Reset Your Chrome Browser
- Restart your Device
- Update Your Microphone Driver (Windows Only)
- Ensure microphone access is allowed (Windows)
- Ensure microphone access is allowed (Mac)
Ensure the microphone is not muted
Presenters can review their microphone and audio settings while undergoing their system check before entering the webinar room.

Once they’re in the webinar room, they can mute and enable their microphone using the microphone icon in the content section at the bottom of their screen. If the icon is white or red, it has either not been connected to BigMarker, or is muted. Click it again to unmute, then test it by speaking again.

If you are still having issues, check to see that your microphone is not muted by your computer or by the microphone itself.
Check your hardware connection and configuration
If you’re using external hardware, whether it’s a headset or external microphone, check the physical connection between your headset/mic and your recording system. Beyond ensuring its plugged in, check the wire for any bends or unusual bumps, which may be preventing it from transmitting properly.
If the wire looks and feels normal, try unplugging and re-inserting it back into the drive. This can “reset” and alleviate any hardware connectivity issues that are preventing your microphone from working correctly. Also, ensure that any hardware mute buttons have not been pressed.
Close Zoom, Skype or other background apps
Zoom, Skype and other video apps may be “hogging” your device’s microphone and webcam capabilities, preventing you from using your microphone on BigMarker. Quit any apps that are running in the background, then retry your microphone.
Close browser tabs
Even if they’re not actively using the webcam and microphone, excess Internet browser tabs and programs may prevent your microphone from working properly because real-time audio streaming requires considerable memory and processing power. If you are on a low-powered system and intermittently face microphone issues now and then, it could be that there is not enough free memory for the BigMarker microphone to work properly.
Google Chrome or Firefox also use a significant amount of RAM and processing power, which could also impair your microphone’s performance. Close any background apps or other browser tabs to clear up memory, then retry your microphone.
Ensure the correct input device is selected (Chrome)
Chrome can “select” which microphone will provide audio input to different devices. So if you are experiencing microphone issues on BigMarker, but not on other sites, you may need to change your microphone settings on Chrome or Firefox.
Open Chrome, then click on the three vertical dots in the top right corner of the browser. Select Settings in the dropdown menu that appears.

On the left sidebar, choose Privacy and Security. Select Site Settings.
Scroll down to Permissions. Under this menu, select Microphone.

If the toggle toward the top of the screen is off, switch it on so that it reads “Sites can ask to use your microphone.”

In the dropdown menu at the top of the screen, select the microphone you’d like to use on BigMarker. In this case, MacBook Air Microphone has been selected.

Allow BigMarker access to your Microphone
At the bottom of your Microphone settings page is a list of sites that are allowed to use that microphone. Confirm that bigmarker.com is on the list and can use your microphone. If BigMarker doesn’t have microphone access, log into your BigMarker event and click the icon on the far left-hand side of the URL bar of your browser.

On Chrome, click allow to grant access to your microphone, then retest your microphone.
On Firefox, choose your desired microphone in the provided dropdown menu, then click Allow.
Restart Chrome or Firefox
A browser restart may clear your cache, restart extensions in the background and clear up extra space, which could allow your microphone to work. Closing and reopening the app may be sufficient, but it won’t always remove all the background processes and extensions running interfering with your microphone performance.
Fully Reset Your Chrome Browser
To fully restart your Chrome browser, open a new tab and type ‘chrome://restart’ in the URL bar, press enter, then test your microphone.
Fully Reset Your Firefox Browser
To fully restart your Firefox browser, select the three vertical bars on the right side of your search bar, then select Help in the dropdown that appears below.

Select Troubleshoot Mode.

A pop-up will appear asking whether you'd like to restart Firefox. Select Restart.

Restart your Device
If restarting your Internet browser doesn’t work, restart your device. This will remove your system’s cache files and background processes which, like your browser’s cache, may be preventing your microphone from working.
If you have an external microphone, turn off your device, wait 20 seconds, then restart. If you’re using an internal microphone or headset, use your device’s restart command.
Update Your Microphone Driver (Windows Only)
If your microphone driver on Windows is outdated, your microphone may not work properly. Update your driver using the steps below:
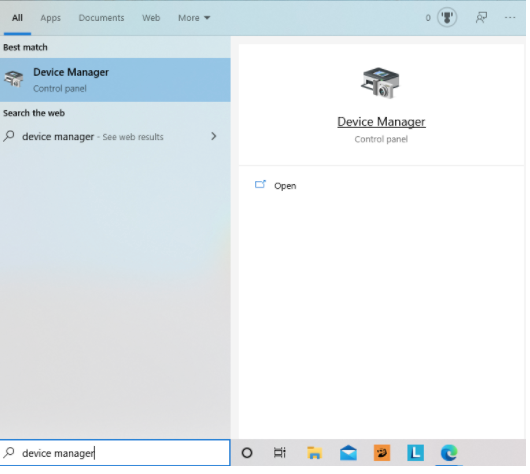
Type “Device Manager” into your taskbar, then select the device with the same name.
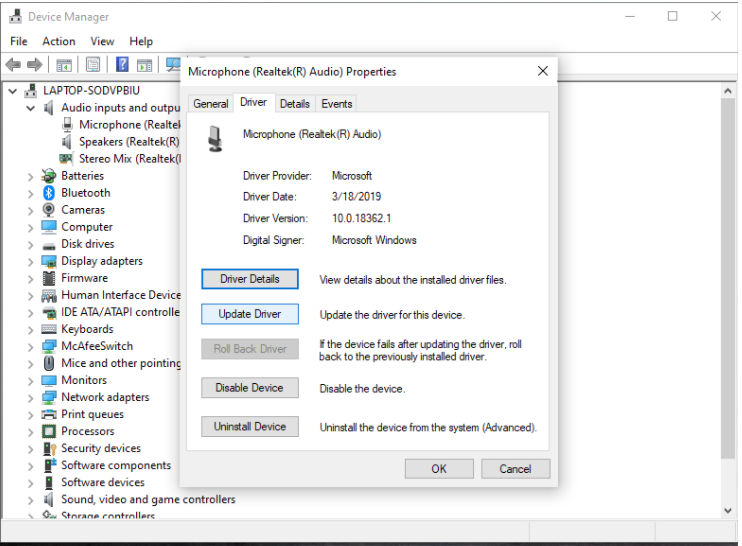
Select the microphone you’d like to use with BigMarker, then right click on it. Select Properties.

In the pop-up that appears, click the Driver tab, then select Update Driver.
Ensure microphone access is allowed (Windows)
Similarly, Windows may have denied microphone access to your Chrome or Firefox browser. Check your microphone permissions on Windows with the following steps:
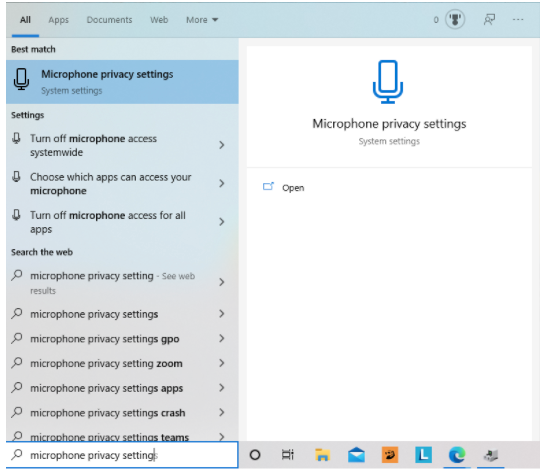
In the Start menu on the bottom of your screen, search “Microphone privacy settings.” Click on the Microphone privacy settings option that appears on the screen above.
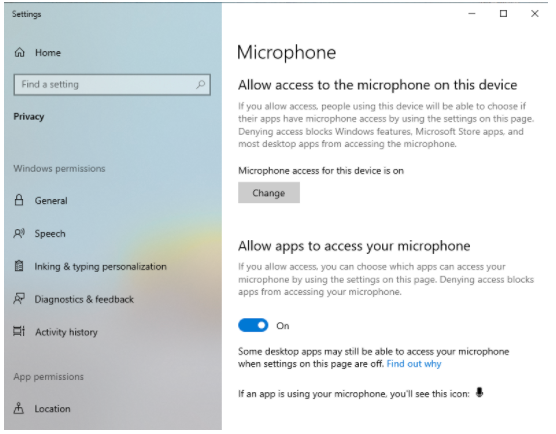
Ensure that Internet browsers and apps can use your microphone by toggling “Allow apps to access your microphone” on. If not, click the toggle to enable it.
Ensure microphone access is allowed (Mac)
If you’re using a Mac, make sure that you can use your device’s microphone using the following steps.
Select the Apple icon on the top left corner of your device, then System Preferences.

Select Security and Privacy, then click the Privacy tab.


In the left-hand menu, select Microphone. In the box to the right, check the box next to your Internet browser. This will give your Internet browser access to the microphone on Mac.
